Q: Doesn't digitizing the vinyl remove the "magic" from the "sound" of the format?
Q: Won't a CD, digitally transcribed by the record company, from an analog master tape, sound better than a CD burned from a transcription of a vinyl record? After all, you're introducing at least two more generations of transducers into the process (cutting the record master is one, playing back the record is the second).
A: All of this seems likely, at first glance. We thought that a vinyl record transcription would, at best, only approach the quality of a CD sourced at the factory from the same master. In theory, that's probably correct. But this theory seems to have broken down in the real world. The information below concerns the design of Pure Vinyl, and discusses some listening tests and conclusions.
The underlying DSP software that's at the core of Pure Vinyl has been kicking around our labs and listening rooms for several years now. The idea was born with the advent, several years ago, of the super high quality reference standard LynxTWO sound card, with up to 200 kHz sampling (and a true 100 kHz analog bandwidth), at a 24 bit sample rate, with inaudible and nearly unmeasurable levels of distortion and noise.
At first, we wanted to implement some form of digital playback for vinyl. The goal was to eschew analog RIAA equalization in favor of a DSP solution that contributed zero distortion (no capacitors!) and was immune from the effects of analog component tolerances.
(Incorporating a DSP based crossover for integrating a subwoofer is an enhancement planned for a future public release of the software, once we make it versatile and adaptable to a wide variety of listening situations, and have received enough feedback regarding the current software. We have been using a special, development version of the software, with this capability, for a few years.)
The turntable pickup cartridge, through our low-distortion linear gain stage (here's a photo of a crude prototype, which was lithium battery powered, with 40 dB gain, designed for a high-output, moving magnet type cartridge), directly fed the LynxTWO A/D input. Our DSP software, in turn, fed the LynxTWO output, which was connected to the sound system output amplifier. (As noted below, for purposes of simplicity, we've moved to a commercially available microphone preamp and low-output moving coil cartridge.) From the outset, the prototype sounded quite good!
The measured performance of the (available from our downloads page) Pure Vinyl software (as the deviation from "perfect" inverse RIAA curve specification) are:
- +0.06, -0.00 dB, 20 Hz - 10 kHz
- (just +0.01, -0.00 dB, from 20 Hz - 3 kHz)
- rising gradually to +0.2 dB at 20 kHz and +1.0 dB at 50 kHz
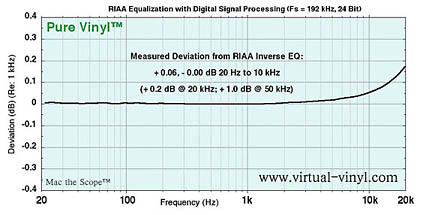
The above graph represents an actual measurement of the Pure Vinyl inverse - RIAA filter: the amplitude of a swept sine wave fed through the filter was compared to the prescribed, RIAA standard EQ curve. Note that the vertical scale of the graph above is very highly magnified (only 0.1 dB per division, and less than 1 dB full scale). To obtain this exceptionally accurate result, the DSP filter was very carefully tuned and optimized.
The slightly rising high frequency response helps to counteract the 50 kHz low-pass filter needed for the vinyl cutting lathe used in the vinyl mastering process. This isn't part of the official RIAA specification, but such a high frequency boost is promoted by at least one phonograph preamp manufacturer, using an even greater boost of 3 dB at 50 kHz.
Significance of frequency response errors: 0.06 dB might seem to be a piddling number, in the face of loudspeaker/room variations of several dB or more. However, the important difference between RIAA equalization and loudspeaker/room variation is that in the latter, peaks and dips tend to occur over very narrow frequency ranges. Fortunately, human hearing is tolerant to such variations, when listening to music.
On the other hand, broad frequency response variations (the general peaking or sloping of an out-of-spec RIAA equalization network) is quickly perceived as an overall "coloration" of the sound. Therefore, it's much more important to be concerned about the accuracy of RIAA equalization networks. Incredibly, recently published tests of commercially available phonograph preamps have shown broad variations of as much as a few dB; and on and upwards of 10 dB or more!
Significance of interchannel amplitude and phase variation: Equalization curve matching between the left and right channels is an even more important issue! Unmatched equalization will cause stereo image shifts and sound staging problems because of interchannel amplitude and phase variations. The DSP equalization used in Pure Vinyl is mathematically, exactly the same in amplitude and phase for both channels (in other words, a tolerance of ZERO dB and ZERO degrees). In contrast, it is impossible for an analog RIAA preamplifier, which has to contend with real-world resistor and capacitor component tolerances, to achieve this level of performance.
The accuracy of the RIAA correction curve is a very important factor in the integrity of the signal chain affecting the quality of music reproduction from phonograph records.
Our comparison between LP and factory-mastered CD versions of the same music...
For the LP (Ortofon X5-MC moving-coil cartridge) recording process:
(Note: this cartridge is an example of a decent, middle-quality pickup.)
1. Digitize through a custom designed differential instrumentation amplifier preamp at 176.4 kHz and 24 bit resolution (we since have moved to a commercially available microphone preamplifier, and standardized archiving at 192 kHz, since designing new, high quality factoring decimation filters for simultaneously generating CD-quality "jukebox" output).
2. Apply inverse RIAA EQ at 176.4 kHz. Resample audio by factor of four to 44.1 kHz 16 bit, taking care to match the digital signal level to the digital CD versions of the songs, aiming for a 0.1 dB or better loudness match.
For the listening test:
3. Burn vinyl and test tracks to CD (copied from the commercial CD), alternating CD and LP versions.
4. Listen to the tracks through a commercial, medium-quality ($700 price range) CD player.
The goal was to try to remove as many variables as possible between CD and vinyl; e.g., both the CD and vinyl versions were played through exactly the same CD transport, DAC, etc.
The result? In a single-blind test, the vinyl version was preferred! In fact, knowing the purposes of the listening test, one test subject actually admitted to thinking, during the listening session, that the version that "sounded" better was the CD version!
This was an unexpected result! How could audio reproduced through an analog to mechanical to mechanical to digital signal chain exceed the quality of analog to digital, done at the factory?
Our hypothesis to explain the discrepancy is the "human element." This is just a supposition, because we contend that it's illogical for the vinyl to sound better than music from a CD, which has probably passed through fewer processing steps.
What do we mean by the "human element?"
- Mastering a vinyl record is a complicated, technical and artistic process. There are countless ways to foul up, and a mistake usually means that the whole mastering job has to be scrapped and started over. Therefore, vinyl mastering engineers have to be VERY, VERY GOOD at their craft, which can't be learned overnight. They are committed and experienced, and with this commitment comes an intolerance for "bad sound."
- On the other hand, many shops might view CD mastering as a turn-key, push-the-button-and-it's-done process. It may not take as much of a commitment to audio to land a CD mastering job, compared to vinyl mastering. One might imagine an operation where old recordings are converted to CD "reissues" in a time-is-money, cut-all-corners, assembly line fashion. There are fewer ways to foul up; however, the results of a mistake can be a subtle degradation in quality, that might not be apparent to an inexperienced CD mastering engineer.
This isn't meaning to say that the above is true of all CD reissues - it certainly isn't - but this line of thinking is where we've arrived in trying to reconcile our listening test results: the vinyl mastering of our test music must have been done more carefully than the CD mastering (because our testing protocol had removed all other variables). There certainly are CD mastering operations that take the same amount of care with their product as vinyl mastering shops, but they seem to be uncommon.
Keep in mind that the conclusion was made with the 16-bit CD quality version, resampled (albeit carefully) from 24-bit, 176.4 kHz (and as mentioned above, we've since standardized on 192 kHz).
Don't
forget: the 192 kHz archive will sound even better than the CD
version... The ultimate goal of Pure Vinyl is archiving the 192
kHz version, and use that for listening: no more stylus wear
from repeat plays, replicating the "live" vinyl playback,
every time the same as the first time. The CD format audio is
for digital jukebox purposes (and may even sound better if sourced
from a carefully mastered vinyl pressing than a CD reissue).
Q: Ok, your software-based EQ sounds terrific - but how do I hook up my turntable? Aren't there signal level and cartridge loading concerns?
A: Yes. (And if the below gives you pause in considering Pure Vinyl, we are in the process of providing a "turnkey" solution for those less technically-oriented vinyl aficionados - please stay tuned for further announcements.)
The exact approach depends on whether you are using a high output (moving magnet) or low output (moving coil) type of cartridge. (A third type, ceramic, used on cheap record players, isn't a high fidelity playback cartridge - it's designed for indestructibility, not high fidelity.) There also are so-called "high output" moving coil cartridges that can be grouped with moving magnet cartridges, for purposes of the discussion below.
The issues are: (1) cartridge loading; (2) signal amplification; and (3, ugh) cabling and wiring. However, considering what can be achieved, sonically, the initial inconvenience of achieving the proper set-up is well worth it.
Moving Coil Cartridge:
Strangely enough, it's actually easiest to use low-output moving coil cartridges with software-based EQ and a linear preamplifier! This is just the opposite of the "old days" when a separate, booster "head amp" had to be employed just to get the signal levels to where the regular record preamp could use them.
The reason it's easier is because relatively inexpensive, extremely high-quality microphone preamplifiers are available that are perfectly suitable for the task. Many of today's audio interfaces incorporate microphone preamplifiers with sufficient gain - about 40 to 60 dB is needed.
Now, here's the best part. Most audiophile record preamps use single-ended ("unbalanced") connections. On the other hand, professional audio (recording studios, sound reinforcement) use "balanced" or differential connections. Balanced connections completely eliminate audible hum pickup from the signal wiring. And guess what: microphone preamplifiers have balanced inputs! Goodbye, hum! (click to see noise spectrum measurement)
For those unfamiliar with the concept, a balanced cable consists of two separate, insulated conductors, twisted together helically, usually inside a shielded cable ("standard" audio cables are just one insulated conductor inside a shield). This is what's "inside" a balanced microphone cable.
Like a moving-coil microphone, a phono cartridge's internal coil (whether fixed in place or moving, with respect to the cartridge stylus) is electrically floating, and effectively balanced: "plus and minus," not "signal and ground" (single-ended). (The circuit "ground" or signal "zero" is obtained from the bias current path of the preamplifier.) Many turntables convert this to single-ended (the "minus" wire is connected to the cable shield), unnecessarily throwing away the noise rejection properties of balanced connections. Such turntables may have "standard" shielded cables installed that need to be replaced with balanced to fully realize the benefits of balanced connections.
Some high-end audiophile turntables are available with a built-in, balanced wiring option. This is a smart move, and we hope that it trickles down to turntables that are more economically priced. However, there's nothing stopping anyone from incorporating their own balanced wiring into their own "decks." And much less expensive than seeking out or buying a turntable just because it already has this feature.
If there's an audio jack on the exterior of your turntable, connecting a balanced cable to the jack will probably work adequately. If there's a hardwired set of cables, it's better to disassemble the turntable to access the signal leads from the tonearm, and connect the wiring inside. If you attach the cable directly to the delicate wires from the tonearm, be sure to provide an adequate strain relief for the cable.
One "stock" tonearm that will not work is the widely used Rega RB 250 / 300 / 900, which has the left channel negative cartridge signal connected to "ground." This must be corrected by carefully disassembling the tonearm base where the cable exits, desoldering the ground wire, and removing and replacing the shielded cable with balanced cable, along with incorporating an appropriate strain relief.
Don't fret over the length of the cable; keep it short within reason, but plus or minus a couple of feet or so won't hurt.
If this all sounds just too... simple (once past the wiring issue) to be true, well, that's what we thought, initially. Try it - you'll see! (Of course, software EQ is needed.)
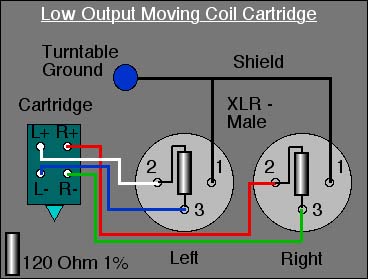
A wiring diagram for the other audio components is shown here.
The XLR connectors can be obtained at electronics outlets, such as http://www.partsexpress.com (their part number is 092-063 for the highest quality Neutrik gold-plated contact male XLR). Obtain precision metal-film resistors from http://www.digi-key.com (their part number for 100 ohm 1% resistor is 100XBK-ND; for 121 ohm, the closest standard resistor value to 120, the part number is 121XBK-ND).
The only remaining (and minor) issue is cartridge loading. Fortunately, moving-coil cartridges are relatively insensitive to loading. Most microphone preamplifiers have an input impedance of 600 ohms - close enough to the typical 100 ohm load. If this seems bothersome (it won't hurt anything), it's relatively easy for anyone even remotely handy with a soldering iron to incorporate a (1 percent or better tolerance metal film type) 100 ohm resistor across the signal leads, inside the cable connector (one resistor each for the right and left channels). (Okay, with a 600 ohm preamp impedance the correct value resistor would be 120 ohms; but this small difference in resistance won't make much difference in the sound - provided the load resistance is the same for each channel, of course.)
Very important: Most professional microphone preamps can be configured to supply 48 volts to power certain kinds of microphones. You should avoid inadvertently activating this feature when using a microphone preamplifier with a phonograph cartridge. (All professional microphone preamplifiers permit this so-called "phantom powering" feature to be disabled, because it can irreversibly damage certain types of microphones under certain circumstances.) The 48 volts is supplied from a common-mode source. If the cable is properly wired, the cartridge won't "see" 48 volts at all. However, if the cable is improperly wired or has a signal fault (one of the cartridge leads connected to ground), damage might occur to the cartridge. In short, use care and avoid activating the preamp's 48 volt phantom powering.
Moving Magnet Cartridge:
Moving magnet cartridges are more sensitive to loading. They should be connected to the "instrument" input on an audio interface (the microphone input impedance is much too low). Moving magnet cartridges typically are designed for 47k ohms load impedance, plus a couple hundred pF of capacitance (the exact values needed will be specified by the cartridge manufacturer). That capacitance may have to be incorporated into the wiring to the preamplifier (see below).
As a plus, many decent quality audio interfaces have balanced (see above discussion) inputs, with sufficient gain for phonograph cartridges on the instrument inputs.
If the cartridge isn't properly loaded, and just connected to a (typically 100k ohm) instrument input, the result will be a slightly brighter (up to several dB) treble, above 10 kHz (the cymbals / percussion instrument range). It won't physically hurt anything, just sound a bit "zingy."
As in the moving coil example above, you can incorporate the load inside the cable connector. Instead of a resistor, use a 220 pF (preferably polypropylene or polystyrene type dielectric) capacitor. You may have to construct a special cable, because audio interface instrument inputs typically use a 1/4" phone (TRS, tip ring sleeve) three-conductor balanced audio connector. Fortunately, there will typically be enough space inside the body of such a connector for the loading capacitor. The points above, concerning balanced wiring for the moving coil cartridge (except for loading issues), should be observed.
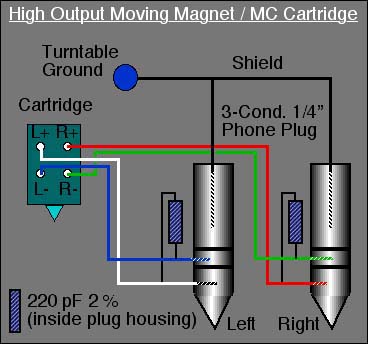
A wiring diagram for the other audio components is shown here.
The TRS connectors can be obtained at electronics outlets, such as http://www.digi-key.com (their part number for the 1/4" TRS connectors is SC1081-ND). The 220 pF (and other value) polypropylene capacitors can be obtained from Mouser; 220 pF 2.5 % tolerance part number is: http://www.mouser.com/search/ProductDetail.aspx?R=FKP2-220%2f100%2f2.5virtualkey50520000virtualkey505-FKP2220%2f100%2f2.5. Digi-Key also has polypropylene capacitors (5% tolerance) available.
Q: That seems like an awful lot of trouble! Is it really worth it?
A: Yes. Again, there's nothing preventing using a standard RIAA turntable preamp. They've delivered wonderful results for over half a century for millions of folks enjoying vinyl records. Just plug it in!
But, for 21st Century tweakers and neo-perfectionists: (balanced wiring) + (high sample rates) + (precision software DSP EQ) = = = vinyl audio nirvana!
Q: What's that 75us checkbox in the Pure Vinyl Recorder application under vinyl EQ? Are there going to be 75 U.S. someday?
A: The goal is to reduce intermodulation distortion by doing the initial 75 microsecond (75 microseconds being the time constant of the low-pass filter; in other words, 2.122 kHz) RIAA equalization passively (with an ugh, capacitor: back to analog tolerances and distortion; which is our issue here), before the preamplifier, thereby reducing the high-frequency finessing that the preamplifier has to do, where it has to work the hardest.
The "jury is still out" on this tweak, because there are certain tradeoffs. If you don't know what this jargon means, then "don't touch it" (because special hardware is needed, ahead of your preamp; without the hardware the sound will be strident). It's only there for the tweakers who understand the possible implications.
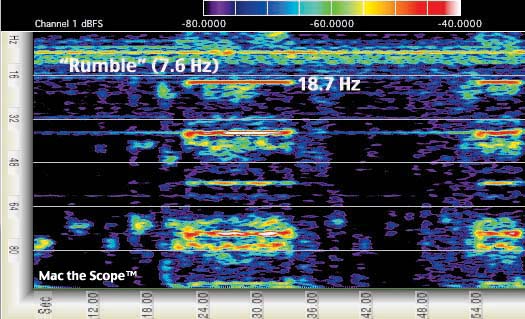
On the other hand, don't be shy about the rumble filter setting. There are very few records with significant content below 32 Hz (we know of just five, out of thousands that we have access to, for testing our products). (If this seems bothersome, then just set the rumble filter to 20 Hz. Unless you then want to play something like the Virgil Fox, Direct to Disc "Fox Touch Volume One" pipe organ recording; see spectrogram below, made without rumble filter.) The fundamental tone is below 20 Hz, and is "felt" more than "heard."