Support
Pure Music / Pure Vinyl Tips, Troubleshooting and FAQ
Updated July 10, 2020 - scroll down under Newest Topics below
MacOS 10.11 - 10.14: "Wrong architecture" upon launching Pure Music or Pure Vinyl - UPDATED
Pure Vinyl 5b31 (5.0.6) Maintenance Update
Pinned topics:
Has iTunes been "discontinued?" See topic on our News page from June 2019.
Security Notices in MacOS 10.14 ("Mojave") - IMPORTANT
"Catalina" OS support / 64 Bit memory addressing and the "this software is not optimized" notice
The current versions of our software products will not run under Catalina / MacOS 10.15. As has been posted previously, please do not install MacOS 10.15 at this time if you want to continue using our software. Please see our News page, and the Catalina OS support / 64 Bit memory addressing topic below, for additional information on this subject.
- MacOS "Mojave" 10.14.6 Pure Vinyl 5 (5.0.5 / 5b30) and Pure Music (3.0.9c) are compatible, but see the important Security Notices topic and other information below under Newest Topics, because the behavior of the OS has changed in recent OS updates, requiring certain settings to be made for the software to function normally.
- MacOS 10.13 and later Pure Music is hampered by an issue introduced in MacOS 10.13 and later (High Sierra and Mojave). Please see topic below, "Unexpected Quit (High Sierra and Mojave OS)" which has been updated with new information about the forthcoming Mac OS 15 ("Catalina").
Should you upgrade the OS and iTunes? Please see the topic "Adopting Apple Software Updates" below for advice regarding Apple updates.
It's prudent to not be an early adopter of an OS update. Allow the dust to settle for at least a week or two before installing major OS updates. It's unusual, but it has happened that undetected but serious bugs in the initial public release of a new OS are addressed in a dot update. Accordingly, we'd suggest waiting for at least the first incremental update for any major OS update, before adopting. In accordance with Apple's advice, always make a backup of your hard drive, including the iTunes music library catalog files before updating the OS or iTunes, so that reverting can be done in the event of unexpected issues.
This should go without saying, but never install Apple "Beta" pre-release OS software unless you are prepared and able to restore the computer from a backup. Beta software may contain significant, show-stopping bugs, can cause data loss, function unpredictably, or cause other software to behave unpredictably or even cease to function. Install a Beta OS version at your own risk. (Case in point: there were show-stopping bugs in Sierra 10.4 betas 1 and 2 that hampered folks who installed it. Don't put your computer at risk with a beta OS.)
If you are running Pure Music 2 and do not intend to upgrade to Pure Music 3, do not update the OS beyond OS X 10.10.5 (Yosemite) and do not update to iTunes 12.4 (or later).
Pure Music 3 is required for full compatibility with El Capitan (and later) and iTunes 12.4 (and later). This is also true if you are running Pure Vinyl 3 and do not intend to upgrade to Pure Vinyl 5. Pure Music 3.0.9c can be found on our Download page.
General Topics
|
|
1. Shut down (not restart) the computer
2. Power cycle (off - on) the DAC, including briefly unplugging the connecting cable between computer and DAC (while both are powered down).
Note: If the DAC doesn't have a connecting cable and attaches directly to the computer (or is powered by the computer), briefly unplug it from the computer.
Note: If using a digital converter to drive the DAC, such as USB to S/PDIF or AES/EBU converter, the "connecting cable" would be the one between the computer and the converter. The associated coax, AES/EBU or Toslink / optical cable does not need to be disconnected.
3. Reconnect DAC, apply power to DAC, then turn computer on.
|
|
If the behavior of Pure Music on your system apparently changes, then it's very likely that something else has changed on your system (OS, iTunes version, hardware / hard drive, etc.), or changes have been made to the settings in Pure Music.
As far as reloading or reinstalling the Pure Music application or audio device drivers, it is extremely, extremely, *extremely* unlikely that the application file or other software could become damaged (the only case would be if it were deliberately modified, or if there were problems with the hard drive, in which case other computer problems would be apparent), and so reinstalling isn't a very useful thing to do.
For users more accustomed to Windows systems: Pure Music doesn't rely on installing any dynamic linked libraries or other system extensions. The entire functioning application is contained in the application file. To "uninstall," just drag the application to the Trash. But again - this will almost certainly not have any effect in resolving unexpected issues. Instead, two other operations are much more likely to be successful: System shut down, or resetting application preferences (perfom in that order, resetting preferences only if shut down was not effective):
System shut down (not restart):
1. Shut down (not restart) the computer
2. Power cycle (off - on) your DAC, including briefly unplugging the connecting cable between computer and DAC (while both are powered down)
3. Reconnect and power up the DAC
4. Start the computer
Note: if your DAC is connected to the computer via a USB (or Firewire) to S/PDIF (coax or optical) or AES/EBU connection, such a device that is connected to the computer should be briefly powered down (and briefly disconnected from the computer), as indicated for the DAC above.
Resetting application preferences:
The default settings can be reset by pressing the Defaults... button in the Preferences window in Pure Music. (This will also save a copy of the previous preferences file in the Preferences folder.)
Alternatively, delete (you must Quit Pure Music first) the Pure Music Preferences file in your home directory, in Library/Preferences/:
Users/username/Library/Preferences/com.channld.PureMusic.plist
The Preferences folder containing Pure Music's Preferences file can be opened and the Preferences file deleted by following these steps:
Quit Pure Music if it is running; and also quit iTunes (to make it easier to navigate around the computer screen).
On Mavericks (OS 10.9) or later (Yosemite, El Capitan, etc.):
1. In the Finder, select Library from the Go menu while holding down the Option (not Command) key on the keyboard. (The Library choice will appear when the Option key is depressed.)
2. Locate the Preferences folder, and open it.
3. Locate the file com.channld.PureMusic (or com.channld.PureMusic.plist). If you sort by Date Modified it should be near the top (because of just quitting Pure Music, which modifies the Preferences file; however, if Pure Music has quit unexpectedly, this may not be the case).
4. Drag the file to the Desktop (important: not to the Trash).
5. Restart the computer.
6. Launch Pure Music. You will have to re-enter your activation code (if not running the Demo version) and set up the application preferences again, including choosing the sound device.
7. Move the previous Preferences file from the Desktop to the Trash, then empty the Trash.
On OS X 10.8 or earlier:
1. In the Finder, select Go To Folder... from the Go menu.
2. Type ~/Library/Preferences as shown in the image below.
(The tilde ~ key is to the left of the numeral 1 key.)

3. Click Go.
4. Locate the file com.channld.PureMusic (or com.channld.PureMusic.plist).
5. Drag the file to the Desktop (important: not to the Trash).
6. Launch Pure Music. You will have to re-enter your activation code (if not running the Demo version) and set up the application preferences again, including choosing the sound device.
7. Move the previous Preferences file from the Desktop to the Trash, then empty the Trash.
Deleting the Preferences file would be an unusual last resort in attempting to diagnose or correct a problem. After doing this, you'll have to re-enter the activation code (if you have purchased an activation code), but the code can be copied and pasted easily from your confirmation of purchase email. (Using the Defaults... button as described above will preserve the Activation Code).
|
|
If you are satisfied with the operation of your Computer Music system, and the computer is used exclusively for music playback, disabling Automatic Software Updates is strongly recommended. This insures that the behavior of the computer will not change unexpectedly due to changes in software or OS updates.
This recommendation is included in the "Optimizing System Performance for Audio" section at the beginning of the Pure Music User's Guide, which is included with the Pure Music software download, and on this Support page since 2013.
Automatic checking for updates in iTunes also should be disabled.
The above recommendations should be followed in general because when the computer connects (or attempts to connect) to Apple's server to check for updates, real-time processes (audio playback) can be blocked momentarily, causing unexpected/erratic behavior such as stuttering in the audio.
If you wish to keep abreast of new versions of iTunes and the Mac OS, then our recommendation is do not be an early adopter.
Except for security updates (and again, for a music-only computer security updates will most likely be irrelevant), let the dust settle for at least a week on all OS and iTunes updates before installing new software.
Based on our track record, compatibility of our products with Apple OS updates has proven to be a minor concern (not to say that it can't ever happen). However, a much more important issue involves the audio hardware you are using. This point cannot be emphasized too strongly: do not update the operating system without first confirming that your audio device / DAC is compatible with the new OS; contact the manufacturer of the DAC / audio device for compatibility information. Otherwise, you risk creating an unusable system until the manufacturer delivers a compatibility (driver or firmware) update. Of course, potential compatibility issues can be avoided by adhering to our general advice on updates.
You always can check for new versions of software manually (using Software Update). But it is better to disable automatic checking / updating so that you can maintain control over the configuration and the operation of your computer music system. Further, unless you have a compelling reason to update (such as a new OS or iTunes feature you absolutely must have), if you are happy with the operation of your computer audio system, our advice is to stick with what you have. Don't "fix" it if it isn't broken. Indeed, many of our users are professionals in the media industry that absolutely do not touch - in terms of OS or software updates - any mission critical systems that are already working satisfactorily.
Always maintain a computer backup, and always backup before installing any updates. Then, should unexpected issues arise with an update, it is a simple matter to roll back the computer software and restore full functionality. See the Backup topic here.
We endeavor to test Apple updates as soon as possible after they are released, and post information on this page. We (and that goes for other Mac developers) aren't privy to advance copies of final public releases of Apple updates, and that especially goes for iTunes updates. We obtain them the same time as everyone else. Further, it's our mission to "risk" our own computer systems for our users. In the interest of caution, if you feel compelled to upgrade (despite the above advice), let the dust settle on updates and wait until we give a green light. This typically takes at most a few days; but we will have feedback almost immediately in the very unlikely event that show stopping issues are discovered. Please see the topic "iTunes Compatibility (general comments)" elsewhere on this page for more information.
Disabling automatic System Software updates (Mojave / OS 10.14 and later):
1. Open the System Preferences
2. Click the Software Update control panel
3. Un-check "Automatically keep my Mac up to date" (1)
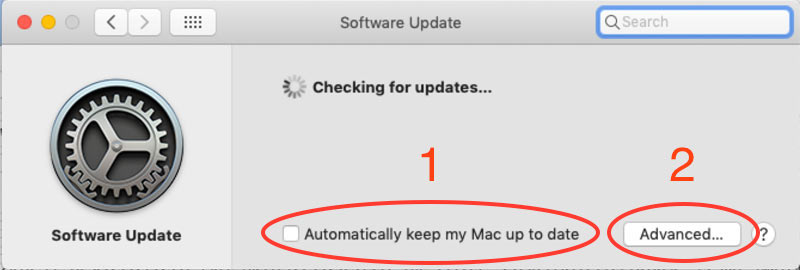
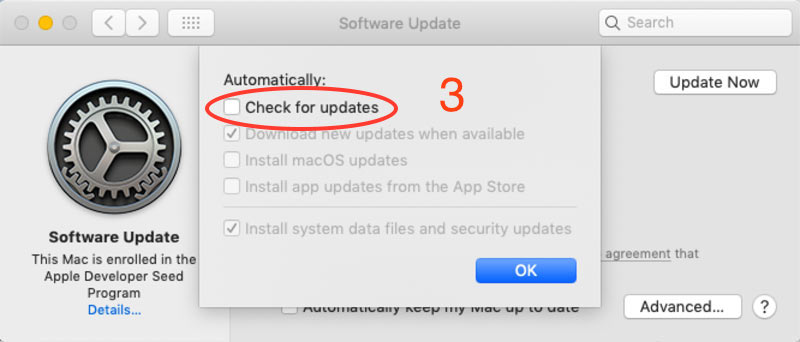
4. Click "Advanced..." (2)
5. Confirm that "Check for updates" is not checked (3)
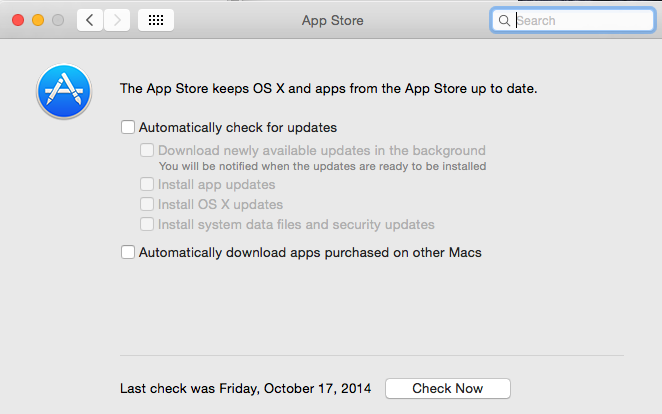
Disabling automatic System Software updates (older OS versions):
1. Open the System Preferences
2. Click the App Store control panel
3. Un-check "Automatically check for updates"
Disabling automatic updates in iTunes:
1. Open the Preferences in iTunes (from the "iTunes" menu in iTunes, or press command-comma)
2. Click the General icon at the top of the window (in iTunes 11.1 and later, click the Advanced icon instead)
3. Un-check "Check for new software updates automatically"
4. Click OK

|
| |
Newest Topics
|
|
UPDATE - Based on our testing and user reports, Apple has released updated software that fixes this OS bug, via installing the latest Security Update, or, alternatively, allowing iTunes to install "new" software for connecting to your iOS device (see description of issue below) - the "new" software incorporates the bug fix.
It is no longer necessary to perform the operation outlined below under "Solution" - just install the latest Security update (or iTunes-directed update, when connecting your iOS device) when prompted by the computer.
Description of Issue
When attempting to launch the application, an Unexpected Quit occurs. The crash log will include the following lines:
Termination Reason: DYLD, [0x2] Wrong architecture
Dyld Error Message:
Library not loaded: /System/Library/PrivateFrameworks/MobileDevice.framework/Versions/A/MobileDevice
Referenced from: /System/Library/Frameworks/CoreAudioKit.framework/Versions/A/CoreAudioKit
Reason: no suitable image found. Did find:
/System/Library/PrivateFrameworks/MobileDevice.framework/Versions/A/MobileDevice: mach-o, but wrong architecture
/System/Library/PrivateFrameworks/MobileDevice.framework/Versions/A/MobileDevice: stat() failed with errno=1
/System/Library/PrivateFrameworks/MobileDevice.framework/Versions/A/MobileDevice: mach-o, but wrong architecture
The issue is related to using iTunes to update an iOS device by connecting the device to your computer:
1. The issue is initiated when using iTunes to update an iOS device
2. The user is asked to install “new” software to allow the update to proceed
3. The trouble happens at this time. A framework called MobileDevice.framework (linked to audio support on the Mac) is replaced with an incomplete version of the framework.
This issue even causes versions of some Apple applications (e.g., GarageBand) to fail launching with the same error. (Some users of GarageBand maintain an earlier version because of a preference for the user interface.)
Solution
It’s likely that Apple will push out a corrected version of the framework, fixing the issue, but the time frame for that is unknown. Until that time, after performing one of the procedures described in the document linked below, use the WiFi method when updating the system on an iOS device, not iTunes.
There are three ways this can be corrected, depending on your situation.
If you have a backup of the computer startup drive before the issue occurred (e.g., with Time Machine or Carbon Copy Cloner);
or you have another computer running the same version of the OS, where Pure Music, etc. successfully launches;
If neither of those apply.
Note: here is the link to a downloadable copy of the document covering the procedure. Download and print the document to refer to while following the steps.
|
|
We've released a Pure Vinyl 5 update addressing an Unexpected Quit that results when using the Internet Track Lookup feature.
The recent proliferation of third-party links and advertising on Discogs causes a memory and CPU usage overload several minutes after performing the lookup. We urge all Pure Vinyl 5 users to adopt this update. Note: this is not a compatibility (MacOS 15) update, which is still in progress.
Version 5b31 addresses a side effect that was preventing selecting the recording destination from working as expected, that was introduced while fixing a few other issues.
All current Pure Vinyl users should install this update.
|
|
Apple has incorporated a notification / warning "this software is not optimized" that appears during launching an application that uses 32 bit memory addressing.
This notice is a warning that such applications will not be compatible with a future MacOS. The current version of Pure Music will not run on the forthcoming MacOS 10.15 (Catalina), which will require an updated version of Pure Music supporting 8 byte memory addressing. Do not install the Developer or Public Beta versions of Catalina (10.15) to use with Pure Music 3.0.9c. (This is not related to Apple renaming iTunes to Music, which in itself is a non-issue for Pure Music.)
64 bit (8 byte) memory addressing is distinct from 64 bit math. All of our software products already use and have used 64 bit math since we started making Mac audio software applications over 20 years ago, in 1996.
Rest assured that we are working on updates to our software products to use 64 bit memory addressing for compatibility with future OS versions.
In case you might be wondering why this hasen't happened sooner, it's because we want to offer full support to users running older OS versions and computer hardware, as a matter of what we think is the fairest product support policy.
A very simple 64 bit MacOS application can be created that doesn't use very many of Apple's OS capabilities and that will run on OS versions back to 10.6. Unfortunately, many APIs (application programming interfaces) used in advanced applications like Pure Music and needed for graphics, signal processing, and the user interface, that replace their 32 bit counterparts (and requiring us to use a different set of application programming commands) are also only supported in newer OS versions and will exclude the full slate of OS versions we want to support in our products. So, a substantial downside to creating 64 bit native versions of our software is that we will have to abandon support for older OS versions.
The latest versions of our products, due to careful and painstaking performance optimizations, still run well on 10+ year old computers, unlike many of those of our competitors. Accordingly, we will endeavor to support older hardware and OS versions as long as it is practical. However, our support for older hardware (and OS versions) will be curtailed under Mac OS 10.15 and later, and will be in line with Apple's requirements for the minimum computer hardware needed to support OS 10.15.
Update - September 2019
MacOS 15 a.k.a. Catalina, anticipated to be publicly released soon by Apple represents, by far, the most substantial and far-reaching revision to the Mac operating system since MacOS X 1.0 was released almost 20 years ago.
It's going to break a lot of existing third-party software. The current versions of all of our software products will not be compatible with Catalina.
We're still working on the revisions to our products, the first of which to arrive will be Pure Vinyl and Pure Music. The sailing has generally been smooth. There is good news and not so good news.
The good news is that much of the core, vital functionality works extremely well with only minor changes since it was already based on 64-bit application programming interfaces (APIs). This includes the audio stack and communication with Apple's "Music" app (formerly called iTunes). The latter is working extremely smoothly, with an always-welcome decrease in the CPU footprint. There also are new security, sandboxing, certificate signing and Apple's application "notarization" requirements which have been managed.
The not so good news, the strong headwind forcing us to tack a lot, is that many of the user interface (UI) APIs supported by Apple since MacOS 1.0 have been discarded in Catalina. This includes the system calls which control all aspects of window management and UI controls (buttons, sliders, lists, etc.) used in the various preference windows and various dialog boxes, etc. for user input, requiring re-creating them from scratch. The exception is the metering window, which has graphics and UI controls already compliant with 64-bit APIs for Catalina. All together, this is not an onerous scenario. There is much relief in that the core functionality of our products wasn't impacted. What remains and is currently in progress is the tedious though manageable task of revising the UI, with work and testing yet to be completed.
To continue using these products, for the time being do not upgrade the OS on your computer to Catalina. We think the updates will be worth the wait. Thank you for your patience and understanding.
|
|
Security features in High Sierra (MacOS 10.13.4 and later) and Mojave (MacOS 10.14 and later) necessitate some additional steps for installing the Streamthrough driver.
1. Download the "Streamthrough Installer Utility for OS X 10.11 or later" from our Download page.
2. Run the installer.
Immediately after getting the “unsuccessful installation” message (after installing the above downloaded Streamthrough installer):
3. Open Apple’s System Preferences.
4. Select the Security and Privacy panel.
5. There will be a message something like “System software from developer “—“ was blocked from loading.
6. Click the Allow button.
7. Now, run the installer again, you should get a message that installation was successful.
8. Restart the computer.
|
|
Launching Pure Music or Pure Vinyl under Mojave, a few notices regarding "application control" or "microphone access" will appear upon the first launch. Click "Allow" or the corresponding choice presented in the notice. These are in addition to the notice described in the separate topic below (64 bit memory addressing / Notice in High Sierra 10.13.4 and later).
The application behaviors causing triggering of these notices have always been present, and on previous OS versions the behaviors occurred silently in the background. However, with increasing OS security restrictions and sandboxing of application activities, this is now called out by the OS. This is, overall, a good thing, but can be slightly annoying or confusing for the computer user.
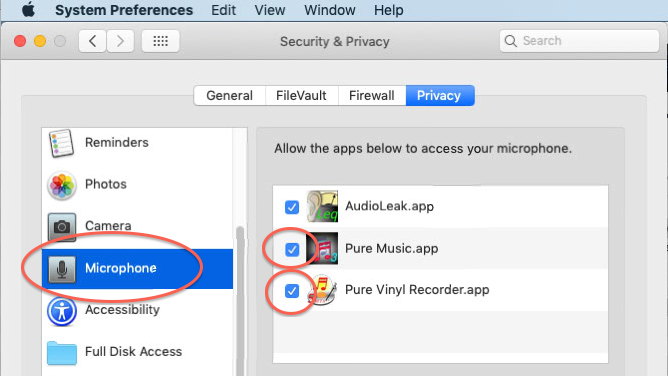
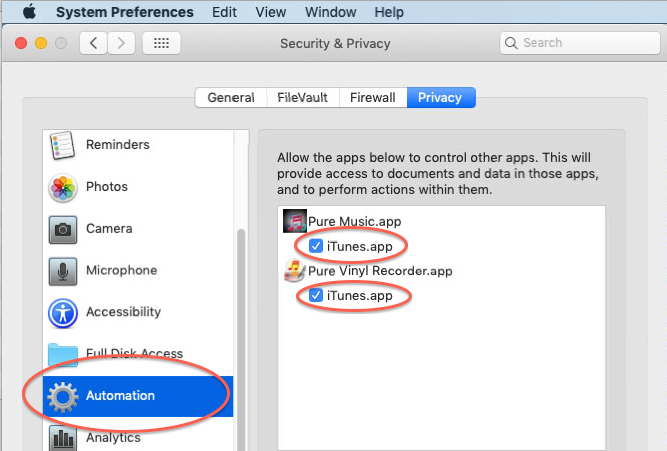
IMPORTANT: we've discovered that "microphone" is actually a euphemism for ANY audio input device used with the computer. Accordingly, it is essential to allow Pure Vinyl and Pure Music to "access your microphone" per the procedure illustrated below. Otherwise, audio input (and the optional Streamthrough feature used in Pure Music) will be disabled by Mojave.
(Pure Music or Pure Vinyl) wants to use the microphone: At launch time, Pure Music and Pure Vinyl both enumerate all of the audio devices available on the system. The action of opening and querying a device for properties, if the device is the built-in microphone, generates this message. Pure Music and Pure Vinyl don't actually "use" the microphone for any purpose.
(Pure Music or Pure Vinyl) wants to control iTunes: This is true of all versions of Pure Vinyl released since 2008, and all versions of Pure Music. It was just never announced by previous OS versions. The operation of Pure Music (and the Music Server functions in Pure Vinyl) implicitly involves controlling iTunes. The notice illustrates another enhancement to user security in the OS, here to make certain the user is aware an application being launched wants to control another application on the computer.
In case you encountered one or both of the above messages and clicked the disallow choice, the settings can be modified for proper operation in the Security & Privacy panel of System Preferences, per the images shown below. (Not shown in the images below, but as is usually the case when making certain kinds of changes to the computer configuration, you first need to click on the "lock" icon in the bottom of the window and validate as an admin user.)
|
|
Updated August 21, 2019:
Based on preliminary testing, as of this writing the current Developer Beta of the forthcoming Catalina MacOS 15 (build 19A536g) has fixed the port leak bug described below that caused an Unexpected Quit. The very good news is that Apple has addressed this issue, at least going forward. We will update this information if Apple also addresses the issue in an incremental update to the Mojave OS (which is compatible with the current version of Pure Music). This does not mean you should update to Catalina at this time, since a Catalina-compatible version of Pure Music isn't yet available for public release.
Summary as of March 29, 2019:
If you have updated to MacOS 10.13 (High Sierra) or later (Mojave, 10.14), or purchased a new Mac computer running either of those MacOS versions, we recommend updating to MacOS 10.14.5 (Mojave), or Mac OS 10.14.6.
The MacOS port leak issue described below hasn't been fully addressed in OS 10.14.5 (or Mac OS 10.14.6), but we've been testing Pure Music 3.0.9c with MacOS 10.14.5 and the Unexpected Quit has been eliminated in playback sessions lasting several hours, up to at least 24 hours. If you are running any version of MacOS 10.13 or 10.14, we recommend updating to MacOS 10.14.5.
Detailed information about Unexpected Quit issue introduced in MacOS 10.13:
We have received reports of and have confirmed an intermittent (in terms of the time after starting a playback session) but eventual Unexpected Quit issue in Pure Music / iTunes on systems running High Sierra (MacOS 10.13) and later. This also may be connected with reports of intermittent pauses happening during a playback session. Neither issue has been reported to occur, nor have we observed it, with older OS versions. It happens whether Pure Music is idle or actively playing music.
Hampering our progress in efforts to address this issue is that triggering it takes a considerable time after starting a playback session. It takes several hours (occasionally a day or more) before the issue manifests; it isn't reliably (that is to say, quickly) replicated through a repeatable sequence of actions. The cause isn't a "memory leak" in Pure Music which would cause similar symptoms, but apparently is related to the event queue in iTunes and its response to interapplication communication (IAC) from Pure Music. The time needed for replication substantially slows down the troubleshooting process. Each troubleshooting iteration takes at least several hours for the issue to occur, rather than the mere seconds or minutes needed for replicating, debugging and fixing a typical issue.
Update (December 6, 2018) We have traced the issue in Mojave (MacOS 10.14) to a port leak bug in the OS, likely due to increased OS security connected with computer automation (interapplication communication or IAC) support.
Update (December 7, 2018) The same issue is manifest in High Sierra (MacOS 10.13), and is actually considerably worse. Every IAC action (commands and data requests) opens a new port which the OS allows to remain open rather than closing it, the responsibility of the OS (and as was routinely done by every MacOS version prior to High Sierra). In Mojave, only IAC actions requesting data trigger the issue, while in High Sierra both data requests and simple commands trigger it. Further, in High Sierra the ports remain open in the target application (here, iTunes) causing iTunes to eventually crash. In Mojave, ports aren't opened in the target (iTunes) but are opened in Pure Music, causing Pure Music to eventually crash instead of iTunes.
This issue is unrelated to 64 bit addressing. It is very easy (now that we have identified it) to replicate with a very simple stripped down 64 bit test case application.
In debugging issues, we usually begin with the assumption that there may be an undetected problem in our software, and proceed with various approaches at debugging it. Here, that proved to be a mistake. The root cause was overlooked because of misplaced faith in the behavior of the OS. This led to a focus on only looking for what proved to be red herrings in diagnosing our software, and for reasons explained above this process was extremely time consuming. Another OS bug, such as the bug that interfered with Pure Music DSD playback (as reported elsewhere on this page, and ultimately resolved by Apple in an OS update), was much easier to trace to the OS since it could be replicated instantly with a few simple steps.
Here is an analogy to what is occurring. Imagine placing the glass and cardboard for recycling at the curb for pick-up. The municipal recycling service (analogous to a function in MacOS) removes the glass and cardboard, which are then fully recycled. This is much like MacOS 10.12.6 and earlier. Now imagine instead that the service empties all the glass and cardboard at the end of the street. Each time you take out the recycling the process repeats. Eventually the heap of materials accumulates to the point that it blocks the road (iTunes), preventing traffic from passing (iTunes crashes). That is the situation with High Sierra. In Mojave, the "recycling" service does something a little bit different. It does properly recycle the cardboard, but leaves the glass in front of your house. Over time, egress is eventually blocked (Pure Music crashes). The High Sierra problem has been somewhat minimized by Mojave (the cardboard is recycled), but the problem is moved to a different place, so rather than iTunes crashing, Pure Music crashes instead.
To summarize:
The bug is not present in MacOS 10.12.6 (Sierra) and all earlier MacOS versions.
In MacOS 10.13 (High Sierra) it causes iTunes to crash after a few hours, when Pure Music is running.
In Mac OSX 10.14 (Mojave) it causes Pure Music to crash after a few hours.
Accordingly, at this time we do not recommend updating beyond Sierra (MacOS 10.12.6). If you have updated to High Sierra (MacOS 10.13), for best performance with Pure Music you should update to Mojave (currently at 10.14.2). The issue is less severe in Mojave, taking longer to occur, and since Pure Music quits unexpectedly rather than iTunes (as in High Sierra), it is easier to resume a session by relaunching Pure Music. It also seems less likely that Apple will fix a bug in High Sierra compared to its successor, Mojave.
We recommend quitting and re-launching Pure Music before the start of a listening session (select the Reset Handshaking command in the Music Server menu in Pure Music) to clear any accumulated OS port leak. At the present time there is no other work-around to the issue, which eventually (after running for a few hours, even idle) causes Pure Music to quit unexpectedly, necessitating re-launching Pure Music.
A bug report has been filed with Apple, and we are waiting for resolution. We deeply appreciate the patience of users who have been affected by this issue.
|
|
The Pure Music Help file provides instructions for incorporating AirPlay devices into your system and playing audio simultaneously over both your DAC and an AirPlay device (with sample rate conversion if necessary) by creating a combined, or "Aggregate" audio device using Apple's Audio MIDI Setup application. This is a useful feature, but has been broken (as detailed below) by changes made in the Mojave OS. Accordingly, if you use this feature, do not upgrade to Mojave at this time.
The origin of the trouble is that as soon as the system’s sound output device is changed from the AirPlay device as set in the Sound preferences, to something else, the AirPlay device drops off the system. This could either be a bug in the OS update, or a deliberate change made by Apple: for instance, in the name of energy saving.
What suggests that this is a bug in the OS is that the AirPlay device is still “selected” insofar as it is part of the Aggregate device being used for sound output, and therefore removing the AirPlay device from the system yanks the rug out from under the Aggregate device, so to speak.
The above can be worked around, but there is another thing happening, which is ultimately breaking it, and this is the bad news. At the same time, iTunes automatically switches its own output device to the AirPlay device that is selected in the Sound preferences panel (or AirPlay device plus Computer). This was never done before, in previous OS / iTunes versions. This keeps the AirPlay output from being used by Pure Music, because only one application can use AirPlay at a time. And if that AirPlay device is then disabled manually by the user in iTunes, it drops off the system again (also new behavior by the OS / iTunes), breaking the Aggregate device.
We will update this topic as more information becomes available, but if you use this feature, do not upgrade to Mojave at this time.
|
|
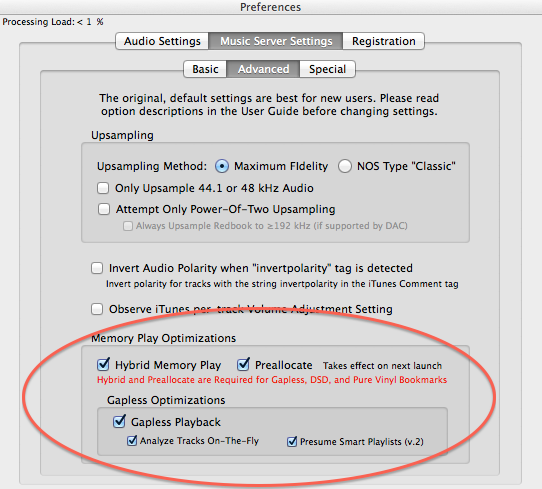
1. Please be certain that the Memory Play settings are set to the factory defaults, as shown below.
2. A crash or freeze can result from having multi-byte characters in either the names of tracks, or in the name of the album folder, or other "illegal" characters.
Try erasing part of the name of the album folder, or paring it down to a minimum, also eliminating / substituting any multi-byte characters (é, ü, ß, etc.) that might be in the name of the album folder. Be especially wary of dashes (-) which might actually be keyboard-excepted typographic style "em" (extended) dashes (–). This will cause the Add... operation to fail; likewise with any slashes (/) or colons (:).
As a quick test, copy one track from the album to the Desktop. Perform the Add FLAC... operation on the desktop based track. If the operation completes successfully, the offending character is likely located in one of the folders (such as the album folder) in the path to the file. If it does not complete, examine the name of the track on the desktop for offending characters.
Accordingly, if there are any dashes (slashes, colons) in the album name, replace them with spaces or with a dash that you've typed in with the keyboard. Then, try the Add FLAC... operation again. It would also be prudent to try it with one track at a time, as a start.
|
|
Certain audio applications running under the High Sierra OS 10.13 through 10.13.3 are unable to open or will crash when attempting to open high sample rate Apple Lossless format audio files. Pure Music DSD Bookmarks are examples of such files (sample rate 2,822.4 kHz and higher).
If you are running a version of High Sierra earlier than 10.13.3, you should update to 10.13.4 (or later). If you are not running High Sierra, there is no need to update.
UPDATE - April 5, 2018 - The High Sierra 10.13.4 update has fixed the above OS bug preventing DSD playback in Pure Music.
NOTE: If you are using audio plug-ins, some plug-ins may cease to function under High Sierra (this behavior is not confined to Pure Music). If you depend on all plug-ins functioning, do not upgrade to High Sierra at this time.
|
|
Users running MacOS 10.8 and earlier may be unable to purchase products from our web store, due to new Internet security features that require OS 10.9 and later. For more information and a solution / work-around if using an older Mac OS version, please see the topic "The MacOS version compatibility / Internet transaction security dilemma" on our News page.
Note: you don't need to purchase our software with the computer where it will be installed or used. The product activation code is delivered via email, and it can be purchased from a tablet, smartphone or Windows (or other OS) computer.
|
|
To transfer the preferences settings and license code from Pure Vinyl:
1. Launch Pure Vinyl
2. Open the Preferences window in Pure Vinyl
3. Hold down the Option (not Command) key on the keyboard while clicking the Defaults... button. This will open the Preferences folder where Pure Vinyl stores its Preferences file.
4. Quit Pure Vinyl
5. Locate the file com.channld.PureVinylRecorder (or com.channld.PureVinylRecorder.plist)
6. Select the file and press command-D on the keyboard to duplicate it
7. Rename the duplicate to com.channld.PureMusic (or com.channld.PureMusic.plist if the .plist extension is visible). If the file already exists, locate the existing com.channld.PureMusic file. As a precaution, duplicate it (as in step 6), then drag the original to the Trash. Finally, rename the PureVinylRecorder file.
Launch Pure Music and your Pure Vinyl preference settings and license code will be applied.
|
|
We've observed on a few occasions after launching Pure Music (particularly after a computer restart, or if the computer has been idle for a period of time) with iTunes 12.4.1 or later the playback can "hang" on the first attempt (or may skip to the end of the track). This is due to changes in the state machine and iTunes interaction that we are investigating.
The work-around is to Quit and re-launch Pure Music (important: leave iTunes running); alternatively, select Reset Handshaking from Pure Music's Music Server menu at the top of the screen.
UPDATE (August 2, 2016): This issue seems to have been mitigated if not eliminated by installing OS X 10.11.6 and iTunes 12.4.3.
|
|
The Pure Music Streamthrough feature requires OS-specific Streamthrough drivers for Yosemite and later OS versions because of additional security features included in recent OS updates. This includes previous Streamthrough installations that were later upgraded (Streamthrough would stop working in those cases).
The solution is to download and install the OS - specific Streamthrough driver. It is unnecessary to uninstall the previous driver if you were running Streamthrough with a previous OS version. Pure Music 3 or later is required for Streamthrough support under El Capitan (OS X 10.11) and later.
OS X 10.11 and later (El Capitan / Sierra)
Streamthrough Installer Utility Download
Streamthrough Uninstaller Utility Download
Yosemite and earlier
Streamthrough Installer / Uninstaller Utility Download
|
|
|
Pure Music's Preferences file is damaged or corrupted.
Please see topic Problems with "Clean My Mac" or "AppCleaner" third party utility software below for solution.
|
|
|
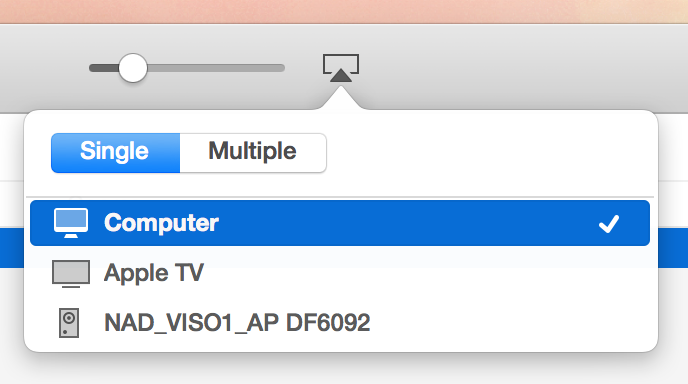
- If iTunes / Pure Music seems to be behaving erratically, please be sure the AirPlay device (if present) is set to Computer in iTunes. Please see the figure below.

|
|
|
We have recently uncovered the cause of a mysterious crash on launch of Pure Music, especially after first entering a purchased license code. The common denominator was OS X 10.10.x and the third party software "Clean My Mac."
Clean My Mac replaces / renames Preferences files created by Pure Music while Pure Music is in the process of launching. This, coupled with changes in OS X 10.10.x file and security mechanisms are the cause of the crash. As one might expect, Pure Music is the only software that should interact with / modify / make copies of its own Preferences file, not other software doing this "behind the back." One user system had over a dozen copies of Pure Music's Preferences file created by Clean My Mac. Clean My Mac even interfered with launching Apple's plain-vanilla, standard TextEdit application, causing it to crash. Clean My Mac slows application launch times because it must monitor the OS to detect when any applications or processes are launched, in addition to monitoring files and creating duplicates of files, causing more work to be done by the computer.
Dragging the Pure Music Preferences file (including all copies created by Clean My Mac) and the com.channld.activationcodes.plist file to the Desktop (not Trash) restores proper behavior. To locate the Preferences and com.channld.activationcodes.plist files, see the topic below "Uninstalling / Reinstalling as a Troubleshooting Step."
Then, after launching and Quitting Pure Music, the files may be dragged from the Desktop to the Trash.
We recommend disabling or (preferably) uninstalling Clean My Mac, or at the very least configuring it to ignore Pure Music.
UPDATE: a user with Clean My Mac reports that disabling the background application called "Clean My Mac 3 Menu" fixes the issue, apparently without resorting to the above.
UPDATE: we have gotten a report of similar issues running similar software called AppCleaner.
Note: On a computer audio system, it is prudent to stay with a "plain" OS installation and avoid installing third party "helper" utilities which can cause unpredictable system behavior, particularly when new OS updates are installed.
|
|
|
The energy saving measures in OS 10.9 / Mavericks are aggressive and can interrupt the communication between Pure Music and iTunes when the computer screen sleeps.
Solutions:
Set "Turn Display off after:" to Never (Apple System Preferences, Energy Saver control panel)
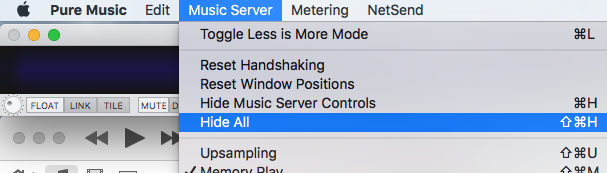
Alternatively, select "Hide All" from the Music Server menu in Pure Music:
Additional information: we are following Apple's guidelines in using the energy saver API "Hints" for controlling application and sound behavior during monitor sleep but it is not behaving in the documented manner. It is related to our use of OpenGL for graphics acceleration, which is a performance enhancing feature.
A few other suggestions: If the reason for using monitor sleep is because light from the screen is distracting, the screen brightness could be dimmed manually. Or else, use the Screen Saver in the Displays control panel, and set it to go to a dark image, which would accomplish the same thing as manually dimming it. The screen saver will not cause playback to pause, whereas monitor sleep will. (Note: Modern LCD monitors are not susceptible to burn-in and the purpose of a screen saver on a modern computer is more of a cosmetic feature than a necessity. Our laptops and desktop Mac Pro / Apple Cinema Display and iMac computers have been left on nearly 24/7 for several years with the screen saver deactivated and have had no issues with burn in.)
|
|
|
Under certain circumstances, the Pure Music window may be accidentally hidden. To reveal it:
1. Click the Pure Music icon in the Dock at the bottom of the screen.
2. Select Reset Window Positions from the Music Server menu at the top of the screen. Please see the figure below.

If Pure Music still remains hidden:
3. Select Preferences... from the Pure Music menu at the top of the screen.
4. Click the Defaults... button in the Preferences window and follow the ensuing instructions.
|
|
Do not rename the Pure Music application, e.g., to "Pure Music 3." Because of the enhanced security protocols in place in recent releases of the Mac OS, you must not rename the Pure Music application. Doing so will cause unpredictable behavior, particularly with iTunes handshaking (e.g., "waiting for media" message).
This also can happen if you have copied Pure Music to your Applications folder multiple times, in which case the OS creates a new name for each copy, e.g., Pure Music-1, Pure Music-2, etc. Those "renamed" copies of Pure Music will malfunction and will not work properly; the Pure Music application file must only called Pure Music (or Pure Music.app).
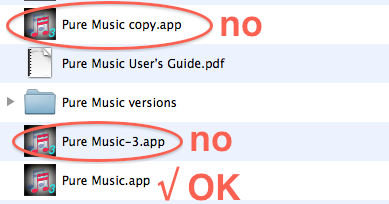
If you would like to run different versions of Pure Music, then place each one into its own folder. The folder name can be anything you like, e.g., Pure Music 2, Pure Music 1.89, etc. Inside each folder, the Pure Music application must be named only Pure Music (or Pure Music.app).
UPDATE: Starting with Pure Music 3.0.5, we've added code to check if the application has been renamed, and will alert the user accordingly.
|
|
Pure Music can be used to play audio wirelessly via Apple's Airplay feature, which is supported by numerous third party audio playback devices, as well as Apple's Apple TV and Airport Express. It's simply a matter of selecting the Airplay output device in the Audio Setup panel of Pure Music (Mac OS X 10.8.2 or later required). Please follow the steps below which apply to the OS version you are running.
Configuring AirPlay on OS X 10.11.2 and earlier
1. Set the Airplay control in iTunes to "Computer." You may need to Quit and re-launch iTunes and Pure Music after making that change.
2. If you have multiple Airplay devices, you may need to select the active Airplay device in Apple's Audio MIDI Setup application (Audio window). (The Audio MIDI Setup application can be found in the Utilities folder.)
3. Be sure the AirPlay device is not muted in Audio MIDI Setup.
IMPORTANT: if you are not using the Airplay device, be sure to set it to "Computer" or else the operation of Pure Music may be adversely affected.
 Configuring AirPlay on OS X 10.11.3 and later
Due to changes made by Apple in OS X 10.11.3 and later, additional steps must be performed after (re)starting the computer, or initiating an AirPlay connection:
1A. Quit Pure Music if it is running (you don't need to Quit iTunes).
2A. Open the Sound control panel (System Preferences).
3A. Select the AirPlay device you want to use.
4A. Open Apple's Audio MIDI Setup (AMS) application (Utilities folder).
If you have already opened AMS, Quit it and then re-launch it. NOTE: Simply closing the Audio Devices window in AMS does not Quit AMS. You must select Quit from the Audio MIDI Setup menu (next to the "Apple" icon at the upper left corner of the screen).
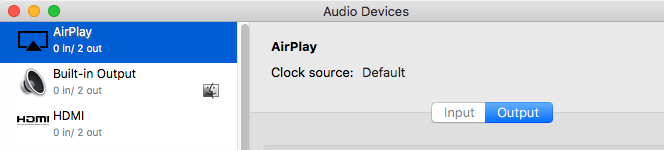
The AirPlay device should be visible in the list of devices in the left side of the Audio Devices window. If it is not, repeat steps 1A through 3A.
5A. Launch Pure Music.
6A. Important: After iTunes launches, be sure AirPlay is set to Computer:
|
| | | | | | | | | | | | | | | |
iTunes Updates / OS X 10.9 "Mavericks" / OS X 10.10 "Yosemite" / OS X 10.11 "El Capitan" / OS X 10.12 "Sierra" Information
|
|
|
Apple released OS X 10.12 "Sierra" Golden Master Preview to developers on September 8, 2016 (Sierra to be relased publicly September 20). We have downloaded and installed Sierra (GM pre-release) for testing with our products, with favorable results. This is as expected, given our experience with our Pure Vinyl / Pure Music products and operating system (OS) updates over the last 10 years, beginning with OS X 10.5.
Based on that track record, compatibility of our products with Apple OS updates should be a secondary concern. A much more important issue involves the audio hardware you are using.
This point cannot be emphasized too strongly: do not update without first confirming that your audio device / DAC is compatible with the new OS. Contact the manufacturer of the DAC / audio device or check their website for OS compatibility information. Otherwise, you risk creating an unusable system until the manufacturer delivers a compatibility (driver or firmware) update. Of course, potential compatibility issues can be avoided by adhering to our general advice on updates. Please see the topic "Disable Automatic Software Updates" for more information.
We discourage upgrading to OS X 10.9 or later ("Mavericks" or later) if you have 4 GB or less installed RAM. It will take at least 8 GB of installed RAM to "hang ten" with Mavericks (or later) on a high performance computer audio system. See topic below, "Mavericks" (OS X 10.9.5) and later OS versions - Memory Usage, for more information. Note: the minimum recommended memory requirement for Pure Music is 8 GB.
--------------------------------
Apple released OS X 10.11 "El Capitan" on September 30, 2015. We immediately downloaded and installed El Capitan on several different computers for testing with our products, with favorable results.
Apple released OS X 10.10 "Yosemite" on October 16, 2014. We immediately downloaded and installed Yosemite on several different computers for testing with our products, with favorable results.
Apple released OS X 10.9 "Mavericks" on October 22, 2013. We immediately downloaded and installed Mavericks on several different computers for testing with our products and will update this topic as more information becomes available.
UPDATE (October 22, 2013): Preliminary testing with Pure Music and Pure Vinyl shows no apparent compatibility issues.
UPDATE (November 6, 2013): Mavericks works well with Pure Music and Pure Vinyl.
UPDATE (September 18, 2014): Mavericks version 10.9.5 works well with Pure Music and Pure Vinyl. Recommended update from earlier versions of Mavericks.
UPDATE Yosemite (OS X 10.10) works well with Pure Music and Pure Vinyl.
UPDATE El Capitan (OS X 10.11) fully tested with Pure Music 3 and compatible. Pure Vinyl 4 recording and editing are compatible; use Pure Music 3 for iTunes server mode pending release of Pure Vinyl update incorporating Pure Music 3.
|
|
|
Because of changes in Yosemite, if you are running Pure Music 1.89g R3 or earlier, do not upgrade to Yosemite (or later OS) if you need to add new FLAC or DSD files to your library, or convert files to Apple Lossless. The Add FLAC / DSD operation and file conversion requires Pure Music 2 for compatibility with Yosemite.
iTunes compatibility:
iTunes 12 through 12.3 requires Pure Music 2 or later.
iTunes 12.4 and later requires Pure Music 3.0.5 or later.
|
|
|
We received the following question in an email: They say: Mavericks is having a better RAM management support than ever before. So I think the information on your support page about upgrading to Maverick is at least questionable, or not?
We have actually tested RAM usage of the new OS by measuring the idle physical RAM used by Mavericks before and after installing on the same computer and it is 15-20% more than Mountain Lion.
There are two things to consider:
1. The amount of RAM taken just to load the OS.
This is the reason for our recommendation about not installing Mavericks if you have 4 GB or less physical RAM.
2. The amount of RAM used by applications.
The second thing could be optimized by Mavericks with RAM compression, but because the memory footprint of applications is usually quite small compared to the OS, there would not be a big improvement.
A rare exception in this case is the Memory Play feature of Pure Music, which does consume lots of RAM. If Mavericks performs compression (as in lossless compression such as used in a .zip file) of RAM this might make an improvement in RAM usage.
However, the problem is that audio data does not compress very well using standard data compression algorithms, so the impact would be negligible.
Even if Apple used an ALAC type of algorithm for compression of such memory - and the OS would have no way of knowing the kind of data being stored in RAM, unless it tried testing various algorithms on the fly - this would be a computationally expensive proposition. Lossless audio compression algorithms are relatively slow when compressing audio (they are fast when decompressing it however) so this would not constitute a very good design strategy on Apple's part as it could noticeably slow down the computer operation. Since there have been no reports of computer slow-downs after installing Mavericks (to the contrary), one must conclude that Apple does not test for the type of data in RAM and just uses a .zip type algorithm (they actually use a very fast algorithm called WKdm that was designed with speed in mind). Even if they did use a special lossless audio compression algorithm, the improvement would be perhaps a 30 percent improvement or just 1.3 to 1 in RAM usage. Memory compression of other types of data in RAM could reach a ratio of 4 to 1 or more (Apple claims a typical ratio of 2 to 1) - but that never will be true of high quality audio.
Further, RAM compression is always used in conjunction with RAM paging to disk. If memory were compressed and paged to disk this would interfere with the rationale for Memory Play: avoiding disk access during music playback. The solution to avoid memory paging, of course, is to have sufficient physical RAM installed.
We hope the above helps to clarify the reasoning regarding recommended RAM with Mavericks on a computer audio system.
|
|
Previous (archived) iTunes Updates / OS X 10.9 Mavericks
|
|
Tested compatible with Pure Music 2 and Pure Vinyl 4. Not tested extensively with Pure Music 1.89g R3 or Pure Vinyl 3, but should not introduce any issues.
|
|
|
- iTunes 11.1.5 (and 11.1.1, 11.1.2, 11.1.3 and 11.1.4) fixes bugs in iTunes and is recommended for iTunes 11.1 users. In particular, 11.1.2 fixes a show-stopping issue that was introduced in iTunes 11.1 involving nested playlists.
- If you are running iTunes 11.0.x, we recommend updating to iTunes 11.0.5 (unless there is a feature in iTunes 11.1.x that you need).
- If you are running iTunes 10.7 or earler, there is no need to update to iTunes 11, unless you find that there are compelling new features in iTunes 11 that you want to use. Please see the topic "Disable Automatic Software Updates" for more information.
|
|
Installing and General Questions
|
|
|
The license to Pure Music / Pure Vinyl permits installing the software on more than one computer, provided:
(a) All computers are used for personal, not business or company use;
(b) The person who purchased the software license owns all of the computers;
(c) Only one copy of the software is running at any time, per purchased license / activation code.
Note: The NetSend feature does not require Pure Music / Pure Vinyl to be installed or running on the receiving computer. See the product User's Guide for more information.
|
|
|
If running the software from the mounted disk image on the desktop, instead of copying the Pure Music application to your applications folder from the disk image, disk images will "disappear" when the computer is restarted. The disk image file itself is still on your computer, but the virtual disk image "volume" on your desktop is unmounted.
Locate the downloaded software (depending on your browser settings, likely saved in the Downloads or Documents folders). Double click the Pure Music x.xx file (x.xx being the version number, and may have a .dmg extension) to mount the disk image on your desktop. Then, copy the application (also suggest copying the User Guide) to your Applications folder. (Afterwards, the disk image can be unmounted by selecting its icon on the desktop and pressing command-e, for Eject.)
If you can't find the downloaded software (or Pure Music User Guide) on your computer, you may download it again from our website, and follow the above procedure. You will not have to re-enter your activation code.
http://www.channld.com/download.html
|
|
|
|
|
|
|
|
We get a message like this very infrequently - in every case it has turned out to be user error in entering the information. Please carefully re-check what you have entered.
Capitalization and punctuation are important. Be sure there are no trailing spaces, and no extra or missing dashes in the Activation Code. Note that the format (number of dashes, etc.) of the activation code may not match the sample code in the Demo software.
If the information was entered by copy and paste from the confirming email, sometimes the code might accidentally be pasted in twice, and this will cause the activation to fail.
The solution:
1. Use the Tab key on the keyboard (after clicking in any text entry field) to select the Activation Code field, then press the backspace or Delete key to clear the code.
2. Then, carefully type (or paste) the code in the box. Beware of adding extra leading or trailing spaces when typing.
3. Then Quit Pure Music and launch Pure Music again.
|
|
|
Below is an example of a kind of thec support email we receive from time to time:
------------------
"Please can you give me some advice about problems I am [recently] having with Pure Music.
The overall impression I am getting is that your developers are having difficulty keeping up with all of the bugs and changes in iTunes.
I have been using Pure Music [for several years], but I am so frustrated with iTunes irrational behavior that I am looking for other HD players that do not rely on iTunes. It seems to me that the combination of Pure Music + iTunes is quite broken.
After selecting and playing a track, when the track finishes playing, another track starts to play - not one I have selected and with no apparent relationship to what I just played."
------------------
Regarding iTunes compatibility: Pure Music is compatible with iTunes back to at least iTunes 9 (which was released in September, 2009; not tested with prior versions, but is probably compatible). Since iTunes 9 Apple has released sixty-six updates to iTunes (counting to iTunes 12.7). In the nearly 7 years since Pure Music was released, we have only had to release five updates to address iTunes and OS compatibility issues: Pure Music 1.89, 1.89g R3, 2.0.4, 3.0.3 and 3.0.5; plus an update for a minor cosmetic issue, 1.6.1. On the average that is less than one update per year due to iTunes and OS compatibility issues. We've usually delivered those updates within 24 hours, so as not to inconvenience users who installed iTunes or OS updates immediately after they were released (not advisable). We think that's a pretty good track record for compatibility updates especially when compared to other companies.
We have learned through experience that issues usually turn out to be due to a simple misconfiguration or something else that can be identified and corrected. It's a matter of our asking the right questions in response to a support ticket. We always try our best to help, but sometimes are stumped.
In the case above, the solution was relatively simple. It turned out that Shuffle Play had (apparently inadvertently) been activated in iTunes, which caused playback to segue to unrelated tracks and albums - the intended purpose of Shuffle Play.
In another case several years ago that we vividly remember, we were unable to determine the cause of a user's show-stopping issue. We were stumped, so we refunded his money. Later, we determined that the issue stemmed from renaming the Pure Music application. (Because this issue has occasionally cropped up afterwards, we've added a test that's performed when Pure Music is launched, so that same problem would be detected and the user notified.)
We have over a dozen different Mac computers to choose from, representing various system configurations, including the latest OS / iTunes versions. Several of those computers can be booted into different OS versions, each running different available versions of iTunes. When Apple releases a new generation of computers we endeavor to purchase representative samples (at full retail price), as part of our R&D budget, for QC testing. Accordingly, samples of the latest generation laptop, iMac and Mac Mini models, as well as Macs running OS X comprising a variety of (Mac OS X 10.5 or later compatible) models covering (as of August 2016) the last 14 years are used for QC testing. We take product testing seriously, and to the greatest extent possible leave no stone unturned. This includes our testing inventory of more than two dozen (and counting) commercially available DACs / audio interfaces extending back for more than the last 16 years.
Our rigorous QC testing regimen for Pure Music and Pure Vinyl software updates routinely includes continuously running (playing through an iTunes library containing tens of thousands of tracks of various file formats and sample rates, including Cloud-based tracks which trigger the Streamthrough feature) the release candidate of a software update under the latest available OS and iTunes versions 24/7 for a week or more before release. In the event that we are compelled to release an unscheduled, compatibility-related update, such testing commences immediately prior to and continues after releasing the update.
Of course, regularly updating iTunes and the OS are not mandatory; one can continue to enjoy a satisfactorily performing system by just disabling OS and iTunes updates. We strongly advise following the advice in the topic Disable Automatic Software Updates below.
The primary reason for that advice is so that users aren't faced with incompatibility issues with their audio hardware after installing a new OS update - not software incompatibility. The behavior of a satisfactorily functioning system will never change unexpectedly, provided that advice is followed.
Regarding iTunes integration, we find it especially advantageous to not "reinvent the wheel" by becoming a "music library / database developer." Our philosophy is focusing on what's paramount: continued usability improvements, playback related feature enhancements and sound quality. Doing otherwise amounts to swimming upstream against the current, considering that iTunes is central to managing audio (and video) media and iOS devices on the Apple platform. Most encouragingly, Apple continues to demonstrate progress in expanding the capabilities of (and maintaining) iTunes' internal scripting mechanism. Accordingly, we plan to continue to support iTunes integration and the Mac OS platform for the foreseeable future.
Please see the topic About GHOST PLAY and the iTunes "Play" button state with Pure Music below for more information about the engineering design choices that are behind Pure Music's iTunes integration.
|
|
Before defining Ghost Play, first let's take a look at the Play button in iTunes, after launching iTunes by itself:

The Play button looks like a right-pointing triangle. This is the "paused" state.
Now, click it. Notice it changes to the "Play" state (two vertical hash marks).
iTunes is playing the file:

Now, try it with Pure Music running:

What? The Play button is in the paused state! However, Pure Music is obviously playing the file (indicated by a signal showing in the meters). What gives?
Here, iTunes is idle / paused, and Pure Music is doing the actual work of playing the music. Pure Music uses iTunes as the database and library organizer; iTunes is not used for playback.
It takes careful engineering to accomplish this, while still having iTunes provide other indications it's playing: for example, the "playhead" moves and indicates the elapsed time, and you can manually drag the playhead to "scrub" the playback position to an arbitrary spot.
So, what about Ghost Play?
Another way to accomplish this, as used by some other software that integrates or links with iTunes, is what's called Ghost Play. By having iTunes play the music at the same time (with the volume muted), the other players are able to "simulate" what Pure Music accomplishes.
However, Ghost Play brings some severe performance drawbacks:
Because it is also playing the music, iTunes is constantly accessing the hard drive / music storage media. This is contrary to the point of having Memory Play or "cache" in the first place.
Memory Play is used to keep the computer from reading from the hard drive during music playback, to eliminate ground spikes caused by increased power supply draw during hard drive access, which contributes to clock jitter - including with an external DAC. However, if iTunes is accessing the hard drive during playback, the benefits of Memory Play are eliminated.
The computer is doing unnecessary work, by playing the music twice.
Rather than merely idling (as is the case when used with Pure Music), iTunes will be consuming a much larger "slice" of CPU.
If you experiment with other player software that interacts / links with iTunes, take a close look at the iTunes "play" button when music is playing. Is iTunes idle / paused, or is it playing the file, as well? If the latter, that's Ghost Play: playing the music twice, just to play it once!
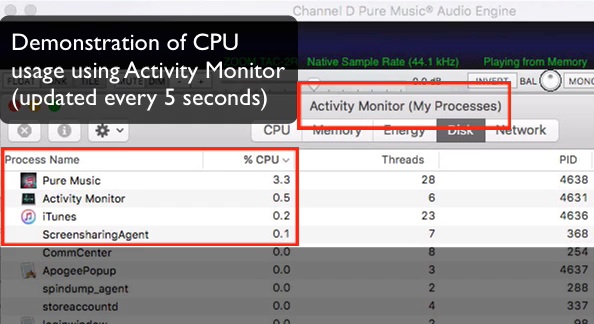
Use Apple's Activity Monitor application to determine how much CPU is being consumed by the player application (and iTunes). Below is a 7 minute long screen capture video showing Pure Music's CPU usage while playing 44.1 and 192 kHz files. The transition to 192 kHz occurs at about 2:00 in the movie. (Note: signal metering was turned off for the measurement.) We invite you to make a similar measurement on other player applications. You will find that Pure Music is very highly optimized for low CPU usage, in comparison.
Click to Download Movie
Click here for a list of configuration settings used in Pure Music for the above movie
We have seen posts on this topic on the Internet and have discussed iTunes interaction with various folks in the industry. We have noticed that some folks have a notion that iTunes interaction / linking is detrimental to sound quality and music players that don't use iTunes sound better. But the big picture is not so cut-and-dried. The truth is that different players have different approaches to iTunes integration. That makes all the difference. Once, an exhibitor approached ("confronted") us at an audio expo and "advised" us we should eliminate iTunes from the mix, because in his conclusive listening tests the players without iTunes linking sounded better (or those that did link with iTunes, sounded better with iTunes linking disabled). But when pressed, the fellow finally admitted never listening to Pure Music! Far from "conclusive" listening tests.
The fact is that the iTunes integration in Pure Music is engineered for the minimum CPU footprint, with iTunes typically only consuming a fraction of one percent of the CPU while Pure Music is playing. This cannot be accomplished with Ghost Play, which will impose a sonic fingerprint on the playback for reasons explained above.
With Pure Music integrated with iTunes you get the best of both worlds: the familiar iTunes user interface coupled with the high fidelity music playback of Pure Music and features not found in iTunes: automatic sample rate switching or Upsampling, Memory Play, precision signal level metering, FLAC and DSD playback, audio plug-ins, dithered volume control, multi-way crossover, etc., plus integration (of plug-ins, metering, crossover, dithered volume control, etc.) with iTunes streaming audio (not to mention streaming audio from other applications), just to name a few of the benefits.
|
|
For Pure Music to work properly, the names of any disk drives holding your music must be unique. Your music collection can span multiple disk drives, but the drives must have different names, and also must not have the same name as any other hard drive or disk volume connected to or mounted on the computer.
If you already have more than one drive with the same name, rename the drive that's not used to store music, or iTunes may be unable to locate the tracks on a (newly renamed) music drive.
Example 1 if you have a hard drive called MusicDrive, and you add another hard drive to your computer to store more music, name it something different, such as MusicDrive2.
Example 2 You have a NAS volume named "Drobo" and you create (or already have) a second volume named "Drobo." Music is stored on the first "Drobo" volume. Rename the other "Drobo" volume, to something such as Drobo2.
|
|
|
Note: the topic below is no longer applicable following the release of Pure Music 1.89g R3 and later updates, which permit playing CDs directly without first ripping them, as a convenience feature added in response to requests from our users.
Features are incorporated into Pure Music that are designed to improve performance and give the best possible sound quality. Using the computer optical drive as a "CD player" or transport is not advisable for best sound quality, for a variety of reasons, so this is not directly supported by Pure Music.
However, there is a work-around, which is to use Pure Music's Streamthrough feature. This disconnects Pure Music from iTunes so that iTunes playback such as Internet radio is routed through Pure Music. This would include CDs played from the optical media in iTunes.
1. Install the Streamthrough feature using the instructions in the User's Guide (or shown during installation of the Streamthrough driver). This setup need only be performed once.
To play a CD (or Internet radio, etc.):
2. Select Streamthrough in the Pure Music Music Server menu.
3. Insert CD, then play in iTunes.
|
|
|
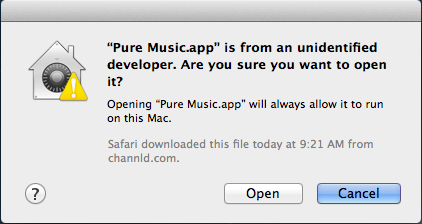
Note: the topic below is no longer applicable following the release of Pure Music 1.89g R3 and later updates, which (per Apple developer guidelines) incorporate an Apple Trusted Developer Certificate and will not generate this warning.
Pure Music must be identified as a "trusted" application to launch it, if it was downloaded after installing Mountain Lion (OS X 10.8).
1. Navigate to the Pure Music application icon (should be located in the Applications folder, if installed as advised).
2. Hold down the Control (not command) key on the keyboard and simultaneously click on the Pure Music application icon.
3. Select Open from the pop-up contextual menu that appears.
4. Click Open in the ensuing dialog box, shown below.
|
|
|
Airport / AirTunes / AirPlay / iTunes streaming (to an Airport Express or Apple TV) is a proprietary, closed design (prior to OS X 10.8.2) with specifications controlled by Apple. The application programming interface for AirTunes is not publicly available.
Regarding other types of streaming servers, Pure Music also isn't designed to work in conjunction with a (for example) Squeezebox, Sonos, etc., per se. These represent different approaches to playing and managing digital audio, so it is essentially an either-or situation. Pure Music is primarily designed to function to convey audio to audio interfaces / DACs connected directly to the computer.
Of course, your music can be located on a network server, and used with Pure Music. The difference is that it's the music which is connected via a network, not the audio hardware.
If you want to stream high-resolution audio, Pure Music's NetSend feature combined with a remote Macintosh and audio interface will receive up to 384 kHz / 24 bit uncompressed audio, over a low-latency, wired Ethernet connection. This also can be used for streaming upsampled CD format audio (upsampling moves the phase shift resulting from the DAC reconstruction filter to above the audio frequency band, one reason for improved playback quality).
For users who want to be able to use AirTunes to stream to an Airport or an Apple TV or some other networked audio devices, many users have reported success with third party streaming utility software called Airfoil, that intercepts the audio stream from Pure Music. If using Airfoil, be sure to set the Airfoil volume controls to a neutral (0 dB, no boost or cut) position. This way, the benefits ot Pure Music's dithered volume control are preserved, and the audio plug-in support of Pure Music also can be used, as well as managing FLAC playback using the iTunes user interface.
To use AirTunes natively within iTunes disconnect from Pure Music by activating the Pure Music Less is More Controller Mode (described in the Pure Music User's Guide included with the Pure Music download).
If you are running OS X 10.8.2 or later, an AirPlay output device is now available. This device can be selected in the Audio Setup window in Pure Music, to stream to an AirPlay device. Note that (as above) AirPlay is limited to 16 bit, 44.1 kHz (this is an AirPlay limitation, not a limitation of Pure Music).
|
|
|
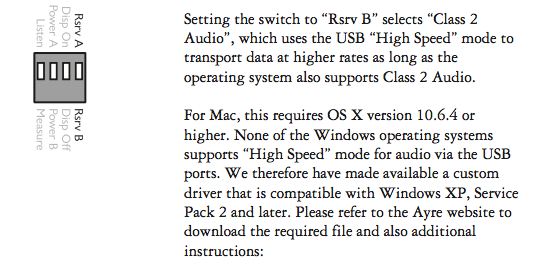
Ayre: The Ayre must be set to USB Class 2, using the switch on the back of the DAC (set to Rsrv B). See image below from the QB-9 Manual. Note: as of the time of this writing, this is not the factory setting, and must be changed to Rsrv B. Other Ayre DAC models may have a slightly different switch configuration.
Zodiac +: Likewise, the Zodiac must be set to USB Class 2 (UH2), using the procedure described in the Zodiac user manual.
- The computer must be running OS 10.6.4 or later!
- Use Apple's System Profiler (Apple menu -> About This Mac; More Info...) to determine if the DAC is plugged into a shared USB port (the Bluetooth and IR receiver are connected internally via USB). If so, plug the DAC into a different non-shared USB port (this may not be possible on some models of Mac computers).
|
|
|
Prior to OS X 10.7 ("Lion"), Apple provided a special API (Application Programming Interface) feature that allowed sending audio directly to the
audio device / DAC in the native format of the DAC.
This mode, called "nonmixable integer stream" mode, slightly reduces computing overhead. It is applicable to sending the audio without any alteration (meaning, precision volume control or audio plug-ins are not possible without conversion to floating point), so its use is confined to a limited number of situations. If volume control, plug-ins or upsampling are used, there is no point to using nonmixable integer stream mode, if the putative benefit comes from avoiding the added overhead of format conversions; precision volume control and other signal processing operations are always performed in floating point format.
Apple removed the ability to send audio in nonmixable integer stream mode in OS X 10.7. However, with the release of the latest Macintosh models with the Core i5 and Core i7 processors, the performance improvement of the combination of OS X 10.7 and these new processors overwhelms the slight disadvantage of not having nonmixable integer stream mode.
In Lion, there is an alternative method, sometimes referred to as "direct mode," which also can be used for accessing native device format streams. We have been investigating this, and it is interesting.
However, using direct mode is extremely risky, because one must write directly to the OS kernel without benefiting from any of the usual API safeguards and memory address protection "firewalls." This is akin to performing open heart surgery on the OS - while the "heart" is still beating!
For a computer that is 100 percent dedicated to audio, this shouldn't "usually" present a problem. However, if the user is browsing the Internet or downloading email or hasn't made the suggested settings to the System Preferences (for instance, disabling Sleep and automatic Apple checking for updates) while playing audio with direct mode, there is a chance of interrupting real-time communication with the kernel / device and causing a kernel panic.
This is the worst possible kind of crash. If this happens at just the wrong time it can trash the hard drive (directory corruption), requiring a reinstall of the OS and complete recovery (all data on the hard drive lost). Or, even worse can trash individual files, which might only be discovered some time down the road, with lurking problems including unpredictable computer behavior (unexplained crashes or freezes), in addition to data loss; and these problems can accumulate and increase in severity.
Journaled volumes are not immune to damage from a kernel panic (startup volume verified after computer crashed from kernel panic, and computer subsequently behaved unpredictably)
One of the fantastic advantages of Mac OS X over all previous Mac OS versions is the use of protected memory. Prior versions of the Mac OS did not employ protected memory, and applications had free rein to modify the contents of memory, including parts used by the OS. In those days, system crashes were commonplace, because a memory addressing bug in an application could potentially overwrite a critical segment of the OS in memory. Accordingly, hard drive crashes were much more commonplace, as well. This situation completely changed with the release of Mac OS X, in which an application only has access to its own memory "sandbox", a significant advance in system reliability. Except that an application with the ability to write directly the kernel, as is done with "direct mode," in a way is a regression to those old days of non-protected memory and its problems.
(Any signal processing operations such as volume control, plug-ins, crossover, etc. must be performed in floating point format for the best sound quality / lowest distortion. If the goal of using an integer stream is to eliminate conversions between integer and floating point format, any putative benefit to using an integer format is eliminated: why perform the extra work to convert back to integer when one already is in floating point?)
It isn't enough to tell users, "just use the computer for audio and don't browse the web, etc. when using direct mode." People often ignore instructions; besides, having a dedicated computer for audio doesn't guarantee that the risk of kernel panics is eliminated. So in keeping with a philosophy of low-risk programming practices, doing things "by the book" and making things as bug-free as possible (a philosophy we have suscribed to for over 16 years), we are not incorporating "direct mode" support at this time. Computer audio should be fun, not frustrating. Any putative benefit pales in the face of having unhappy users with trashed systems. That is not something that is good for the long-term, for anybody concerned. :-)
|
| |
Playback Questions / Issues
|
|
If using the Memory Play feature, Pure Music benefits by starting with a "clean slate." If you've been working with other applications on the computer, and in particular, any other audio applications / players (except for iTunes), a fresh computer restart can be beneficial. Wait a minute or so for the computer to get into a quiet state (total CPU activity below a few percent), as indicated with Apple's Activity Monitor application, set to monitor All Processes.
Please be sure your iTunes and other system software are up to date. After updating iTunes, it is recommended that you use Apple's Disk Utility application to Repair Disk Permissions (not the same as Repair Disk) on the startup disk.
|
|
|
1. First, check to be sure the Mute control at the top of the sidebar isn't mistakenly activated.
2. If the audio output bus is disabled in the Multichannel tab, the output will be silent. If you are playing Pure Music and not obtaining output, check the Audio Settings Preferences, Bus 1 (first pop-up menu) Multichannel tab setting:
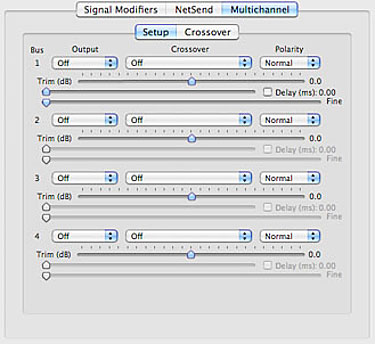
Incorrect Setting

Correct Setting
|
|
|
|
If you use other player software, then you should RESTART the computer before using Pure Music.
We have found that some other third party software does not properly restore the audio hardware settings after running. This causes Pure Music to malfunction, due to the system being left in an inconsistent state. Clicks or noises in the output are a symptom of this. Restarting the computer after running other player software is required to prevent this problem.
|
|
|
|
Solution: toggle the setting of the Dim button off and then back on.
If the Dim button is off, click to turn it on.
(This corrects an issue introduced in Pure Music 1.8a that caused miscalibration of the volume control. Performing the above steps one time will recalibrate the volume control.)
Note: Volume settings above 0 dB will cause clipping / distortion on fully modulated music. To avoid accidentally setting the volume above 0 dB, activate the Dim function.
|
|
|
Be sure you have your computer set up according to guidelines for audio playback, listed in the Pure Music User's Guide, and on our website (see the heading for Computer tweaking).
In particular, please confirm the following:
- Disable Computer sleep (set to Never, not just set it to a long value) - System Preferences: Energy Saver
- Disable the screensaver (set to Never) - System Preferences: Desktop & Screen Saver
- Disable automatic checking for system updates - System Preferences: Software Update
- If using a laptop computer, operate with the power adapter connected
When the computer attempts to conserve energy or enter sleep mode, this can cause an interruption in communication with the audio device, pauses in playback, or other issues. With the above settings, this will be avoided.
iTunes or any other player that accesses the disk periodically during track playback won't be affected, because the computer will appear to be "busy" to the operating system (OS). Pure Music with Memory Play loading a track into RAM before playing the track will make the computer appear to be idle to the OS, so the above settings are necessary.
|
|
|
The Skip buttons in iTunes will be temporarily disabled if a new playlist is manually selected while a track is playing in Pure Music:

Skip Buttons Enabled (left). Skip Buttons Disabled (right).
Important: In this case, Pure Music cannot automatically segue to the next track, if the Use Skip Button for Track Sequencing option (Music Server preferences) is enabled.
Note: this behavior results because iTunes isn’t actively playing the track: Pure Music is playing the track. An alternative design would be to use iTunes “Ghost Play,” with iTunes actually playing the track in parallel (with the volume at minimum), which would be wasteful and undesirable when the goal is achieving the best playback quality and lowest computer activity level.
If you want to both manually navigate playlists and Pure Music to automatically segue tracks (other than by selecting it and pressing Return on the keyboard), then press the Queue Selection button on the control bar (when finished browsing playlists) and then select (click once) the next track you want to have played. The selected track will be played after the current track, and the Skip buttons re-enabled when the queued track begins playing.
The Queue Selection feature also may be used at any time to set the next track to be played. The track is determined at the time the previous track is finished, not when the Queue Selection button is actually pressed.
A few additional tips:
1. Third party “enhancement” software is available that modifies the behavior of iTunes. These applications / scripts, etc. can in some cases cause iTunes to behave unpredictably. Please first try uninstalling such software if you find playback stalling between tracks.
2. If your music library or playlists contain media types besides audio tracks, disable the Use Skip Button for Track Sequencing option in the Pure Music Preferences.
Note regarding playlists and track sequencing
If you explore or select a different playlist after starting to play a track, the server’s ability to maintain the track sequence may be impaired. The rule is that after changing playlists, when the currently playing track finishes playing, the next track to play will be the track following whatever is the selected track (with the Use Skip Button for Track Sequencing option unchecked).
If you select original playlist without doing anything else, playback of tracks will continue in the original sequence. However, if you select a different track (including from a different playlist), play will continue with the track following the selected track.
|
|
|
Use the Advanced Audio Setup... feature of Pure Music to direct Pure Music to use your DAC for output:
1. Select your DAC / audio interface in the Output pop-up menu in Advanced Audio Setup.
2. Set the sample rate pop-up menu to the maximum available value. (Don't change the Limit Rate pop-up menu default of 384 kHz.)
3. Press the Click To Apply Settings button to lock in the changes you have made.
|
|
|
Receiving reports of clicks and other noises has become extremely rare following the release of Pure Music 1.65a and 1.74a. Accordingly, if this problem manifests only at certain sample rates, this suggests an issue with the playback hardware that is sample rate dependent.
As just one example, the HRT Music Streamer II or II+, on certain models of Mac computers, will exhibit obvious audio dropouts several seconds to a few minutes after switching sample rate to 88.2 kHz, and may even stop playing altogether until reset by disconnecting it. (Note: HRT now has a solution for this issue involving a firmware change.)
A simple test using iTunes playing by itself to try to assess if an issue is dependent on the music player software, such as in the above example, may indicate no apparent playback problems. However, testing with iTunes is not necessarily just a matter of launching iTunes and playing audio.
This requires some care in setup, because iTunes always resamples audio to match the hardware sample rate. If the hardware is set to 44.1 kHz, iTunes will not change the sample rate; it will resample high resolution audio tracks back to 44.1 kHz. If the problem is related to the sample rate of the audio hardware, and since iTunes resamples, there is no way to get iTunes to exhibit the problem, unless the hardware is first set to the "problem" sample rate.
To use iTunes to confirm sample rate dependent or other hardware issues:
1. Quit iTunes
2. Open Apple's Audio MIDI Setup application (AMS for short; in the Utilities folder inside the Applications folder). Depending on whether you are using the built-in optical or a USB or FireWire connected DAC for output (note the location of the small "loudspeaker" icon next to the device in the attached example image), select it, and then set the pop-up Format menu to the "trouble" sample rate.
If the "loudspeaker" isn't assigned to the output device you want to use, then use the pop-up "gear" menu at the bottom left of the window (this is with AMS in Mac OS X 10.6; in Mac OS X 10.5 the procedure is somewhat different) to assign it to the correct device. Then set the sample rate with the Format menu.
3. Launch iTunes.
4. Play a track (any sample rate). If necessary, adjust the volume in iTunes, up to maximum. Hardware issues will become apparent at this time.
5. While iTunes is playing, also select each sample rate in the Format section of Audio MIDI Setup. If iTunes begins distorting at certain (usually higher) sample rates, this indicates a communication problem between the DAC hardware and the computer.
The next step, at this point, is to check the digital connections between the computer and the audio hardware. Try swapping the connecting cable, whether optical, USB or FireWire. Power down the computer, disconnect the audio hardware (both of these steps are important), then power down the audio hardware if it isn't bus powered; then re-connect it and power up the computer again. If attempts to solve the problem are unsuccessful, contact the manufacturer of the audio hardware product and explain that you are having trouble using their product for playback in iTunes. If our experience with such things is indicative, the manufacturer will be forced to focus on the hardware issue once you have confirmed the problem with iTunes.
|
Pure Music Application Behavior
|
|
A very popular installation scenario, known as "headless" operation, is using a Mac Mini without attached monitor, operating it (from another computer) via Screen Sharing or via the Apple Remote App from an iOS device (iPad, etc.).
However, on Mac Minis with integrated graphics (e.g., Intel HD Graphics 3000, Intel HD Graphics 4000, etc.) the computer will throttle graphics operations when a monitor is not connected (or connected and not powered) as an energy saving measure. As a side effect, this will cause extremely sluggish or inconsistent operation of Pure Music, by impacting the efficiency of the communication between Pure Music and iTunes.
The solution is to have a powered monitor attached while playing music. If that is not a practical or desirable solution, a device called an EDID Emulator will emulate a connected monitor, and make the computer "think" a monitor is attached, so that the CPU throttling does not occur. An example of such a device (Gefen HDMI Detective Plus) is pictured below (there are many manufacturers and models of such devices, and they can be obtained from electronic vendors - Amazon, Newegg, etc.).
Update: OWC has developed a less expensive monitor emulator that we've tested and have found it works perfectly for this purpose.
The EDID Emulator attaches to the computer HDMI port via a short HDMI cable, and (in the case of the Gefen) does not require external power for operation. If an external HDMI video monitor is used with the computer, a pass-through port is provided on the EDID Emulator for connecting the external monitor.
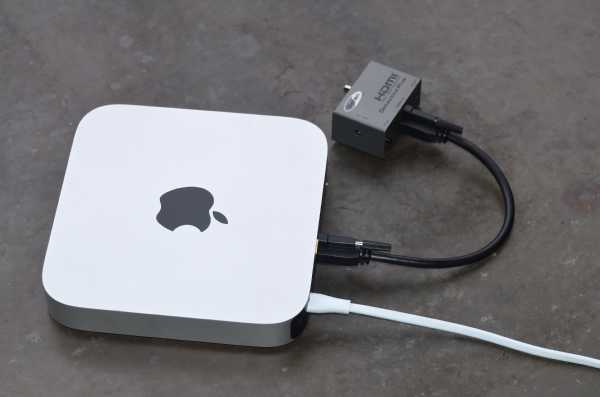
|
|
|
The play button in iTunes doesn't indicate the play state because iTunes isn't playing the file, of course. This is the point of the software: so that iTunes doesn't play the file. If iTunes were playing the file, the button would change to the (||) state (and, in fact, that's a clear indication that iTunes is playing the file). However, with Pure Music interfaced with iTunes, Pure Music is playing the file, which is why the iTunes button indicates (>). There are other ways the Pure Music user interface indicates playing status (for example, the meter bar says, "Player paused...").
On the other hand, if the iTunes "play" button does change to "pause" (||), this is caused by an interruption between the Pure Music and iTunes handshaking communications. To clear this condition, press the RESET button.
Pure Music cannot affect the system state, so rebooting should never be necessary after running only Pure Music and iTunes, even if the communication between Pure Music and iTunes fails. Also, it isn’t necessary to relaunch iTunes after running Pure Music. When Pure Music isn’t running, iTunes will behave in its usual stand-alone fashion. (If iTunes is silent after quitting Pure Music, a simple nudge of the iTunes volume control will restore iTunes’ output volume.)
|
|
|
This is a side effect of activating the "Update Play Position In Remote App" option.
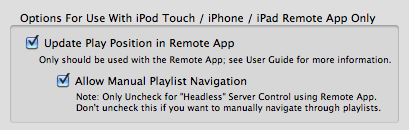
If you aren't using the Apple Remote App on an iPad, iPhone or iPod Touch, this option should not be used.
With the default option "Allow Manual Playlist Navigation" the updates are suspended when iTunes is in the front (selected).
The reason for this design is because Pure Music only updates the play position in the Remote App every 2 seconds or so, to avoid generating excessive RF traffic and transmissions to the Remote. When iTunes is playing the file (another well-known audio player application causes iTunes to play the file, with the iTunes volume muted; the file actually is being played twice, something called Ghost Play) there is a constant stream of RF traffic back and forth to the Remote App, which may have a negative impact on the sound quality. To avoid this, Pure Music only updates the play position occasionally. The downside are cosmetic side effects: the album art may flash and the play button rapidly toggles every 2 seconds. But we feel this is a reasonable trade-off for improved sound quality, which is the reason for using an audiophile-quality music player.
|
|
|
- Tracks purchased from the iTunes store that contain DRM (digital rights management) copy protection cannot be played and will be skipped over. This is beyond our control, because circumventing this protection is illegal under United States copyright law.
Such tracks are encoded as lossy, low quality 128 kbps AAC. If possible, these tracks should be upgraded to iTunes Plus (unprotected) tracks. An alternative work-around is to burn the affected tracks to a CD-R or CD-RW and re-import as AIFF or Apple Lossless. Re-importing in this way removes the DRM copy protection.
The "Streamthrough" feature in Pure Music also can be used to play protected tracks via iTunes. Please see the instructions found in the Pure Music User's Guide (included with the Pure Music software download) describing the Streamthrough feature for more information.

- Disabled tracks (the check box to the left of the track name in list view is unchecked) are automatically skipped, the same as the behavior in iTunes.
The solution is to insure that tracks are checked (see above image). (Note: "checked" is the default in iTunes; they cannot become unchecked unless the user has unchecked them.)
To allow manually playing a single disabled track, check the Allow Manual Play of Unchecked Tracks in iTunes (Special tab of the Pure Music preferences).
- If the media / hard drive holding the track is not available or the track cannot be located (indicated by an exclamation point icon to the left of the track name in list view), it will be skipped, the same as in iTunes.
|
|
1. First, insure that "Reveal Playing Track" (Pure Music Preferences window, Music Server Settings->Special->iTunes) is not checked.
2. Select Hide All from the Music Server menu in Pure Music.
To bring Pure Music or iTunes back to the foreground, select their respective icon(s) in the Dock.
|
|
|
Solution: Disable Full Screen Mode in iTunes (View menu).
|
|
|
Configure the Settings... in iTunes DJ to display at least 5 recently played and 5 upcoming songs.
|
|
|
If playing gapless files from a playlist, and the iTunes playback mode is set to loop, initiating play in the middle of the playlist will cause the playlist to loop, continuing with loading tracks at the top of the playlist until memory has been filled.
Therefore, if you then restart play at the top of the playlist, the tracks will not be reloaded, because they've already been considered as part of the group of gapless tracks (even though playback was initiated "below" the current location).
Keep in mind that if the gapless playback mode seems not to work the way you expect, take a moment to consider the way that you have iTunes configured, and chances are that you will find that the music server is functioning correctly.
|
|
|
If the hard drive containing the music has gone into sleep mode and spun down, it will need several seconds to spin up again. Pure Music (and iTunes) will be unresponsive until the disk has "awakened." This includes briefly not being able to access menus or move the window. The "beachball" cursor may appear at such times.
A NAS drive or RAID array can take as long as 30 seconds to spin up. There is nothing Pure Music can do to accelerate this process, so please be patient before concluding that Pure Music has hung. If this is a recurring issue, configure the NAS / hard drive so that it doesn't spin down, using the utility software that is supplied with the NAS drive, or Energy Saver Preferences on the computer.
This cannot occur in iTunes by itself, because iTunes is always accessing the hard disk during playback. With Pure Music Memory Play, iTunes is not accessing the disk. However, if iTunes is in a Pause state for an extended period, you will find exactly the same behavior in iTunes (an apparent "hang") if the hard disk has spun down.
|
|
|
System sleep should be disabled when playing audio (Energy Saver pane of System Preferences, set Computer sleep: to "Never").
From the point of view of the computer operating system (OS), if using Pure Music's Memory Play, the computer really isn't "doing" anything or "working" during playback, just fetching information from RAM. This is distinct from other player applications such as iTunes, which continually read from the hard disk while music is being played (and that also is true of other player software using iTunes "Ghost Play" to simulate playback in iTunes - but this is playing the file twice to play it once, which is undesirable).
The OS uses disk and (to some extent) CPU activity to determine if the system is idle. Since Pure Music uses far less CPU than other applications, and the disk isn't being accessed during memory play, it is logical for the OS to presume the computer isn't busy or working, and to try to put the system to sleep.
The OS will then attempt to put the system to sleep, but this is intercepted by Pure Music. However during that time, there may be a brief interruption of the sound output. (If the sleep attempt happens at the worst possible time, then it may also affect track sequencing.)
Also, some DACs respond ungracefully if the system is put to sleep. Some will successfully re-establish a connection with Pure Music, but others will not, and only output silence until the DAC is reset (unplugged from the computer then replugged, with Pure Music and iTunes not running).
|
|
|
On older Intel Macs with GMA shared memory graphics, when running in Memory Play mode, it’s possible for the OpenGL texture buffer that’s used for rendering the text to be purged by the OS, in an effort to reclaim RAM. This will cause the text to be rendered at lower resolution, making it appear fuzzy. This is only a cosmetic side effect, and won’t affect the operation of Pure Music. However, this also is an indication that the performance of your computer (and Pure Music) will benefit from having more RAM installed.
|
|
Foreign File Support (FLAC, DSD, etc.)
|
|
|
When converting a 24 bit file, the "Convert Audio Files to Apple Lossless" function in Pure Music may output a 16 bit format Apple Lossless file, instead of a bit perfect copy of the file.
The solution:
1. Select the "Audio File Sample Rate Converter" function from the Pure Music menu.
2. Click "24 bit" in the bottom of the window.
3. Click Cancel to close the window.
After making the above setting, the Convert to Apple Lossless function will work properly.
UPDATE: This issue has been resolved and corrected in Pure Music 2.
|
|
|
Pure Music must be running to allow native FLAC file playback in iTunes.
Important: to use the Add FLAC feature of Pure Music, iTunes must be configured not to Copy Files to iTunes Media Folder when adding to the library, and the Keep iTunes Media Folder Organized option also must be disabled. See image below for the proper settings.
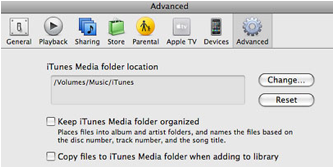
In the Advanced pane of the Preferences in iTunes, uncheck the "Keep iTunes Media folder organized" and "Copy files to iTunes media folder..." preferences.
If you have tried to use the Add FLAC feature of Pure Music with the above settings enabled, the tracks won't play in iTunes (they will be silent). The tracks will have to be removed from iTunes and then added again. This quickly can be done manually, by following the steps below.
1. Locate the FLAC tracks added to iTunes with Pure Music. This is best done using the List view in iTunes.
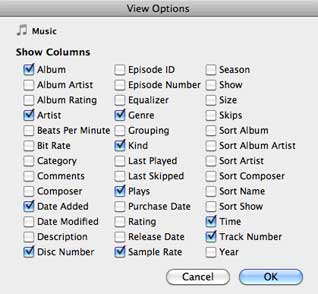
It is easy to find the most recently added tracks if you add a View preference to iTunes (View->View Options) for Date Added, then sort the list with that column.
2. Select the tracks and Press Delete on the keyboard.
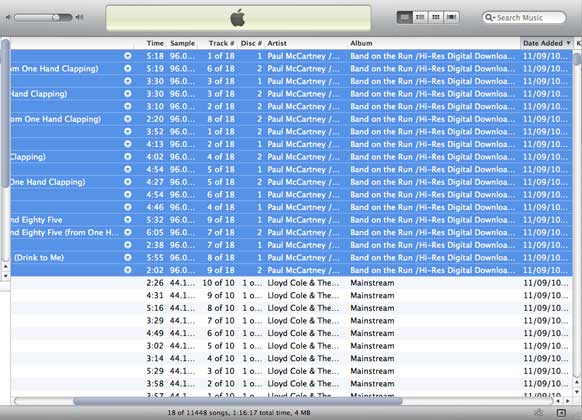
3. Click Remove to confirm. (If asked if you want to remove the original tracks, click the choice that removes the tracks from the library but keeps the original tracks.)
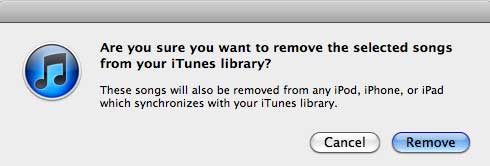
4. Find the Pure Music Bookmark file located in the same directory as the original FLAC files. Select and drag the Pure Music Bookmark file into the iTunes window. With the iTunes Preference setting above to not copy files to the iTunes media folder, this will add the tracks to the iTunes library only as bookmarks, instead of copying the tracks themselves.
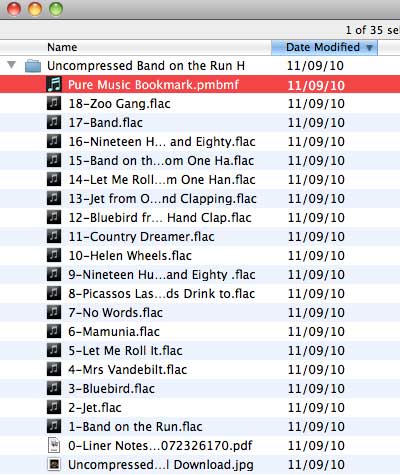
5. With Pure Music running, select (click once) one of the tracks you just added and press Return on the keyboard to play it.
|
|
|
1.There was an error in two files posted by 2L of Norway, 2L53SACD_04_stereo_DSD.dff and 2L38_01_DSD.dff that cause Pure Music to hang during the Add operation.
There is an incorrect (off by one) length in one of the header fields. The files were created using a Weiss Saracon (according to the Comment tag). (Tech info: in the problem files, the chunk size at offset 0x51 for the CMPR tag has an incorrect value of 0x13, when it should be 0x14. This causes the header parsing routine to seek to the wrong offset when scanning for tags.)
2L has posted corrected versions of the files on July 13, 2011 (almost immediately after being notified of the problem).
2. DSD files must be in stereo format. Pure Music does not currently support multichannel (> 2 channels) DSD files.
|
|
|
The built-in optical output of the Mac Pro, as well as all Mac computers introduced before 2010, doesn't support 88.2 kHz. On all Macs the maximum sample rate of the built-in optical output is 96 kHz. (Please see the page Getting Started With Computer Audio for more information on connecting the optical output.)
If you want to play tracks at the native sample rate, you will need a DAC connected via USB or FireWire that supports the file sample rate, or a digital output that provides the native sample rate, such as a USB to coaxial S/PDIF converter, plus a DAC with a digital input that supports the desired sample rate.
Otherwise, the only way to play files with a sample rate not supported by your DAC or digital output setup is via sample rate conversion (upsampling or downsampling).
Note: USB on the Mac supports all common sample rates: 44.1, 48, 88.2, 96, 176.4, 192, 352.8, 384 kHz plus 2.8 MHz (64 Fs DSD) and 5.6 MHz (128 Fs DSD). The supported sample rate depends on the capabilities of the DAC, not on USB.
FLAC file playback in Pure Music requires Memory Play. Downsampling is performed using play-from-disk, but native sample rate playback or upsampling work with Memory Play. However, if downsampling is needed, there are several ways to play your FLAC files if the sample rate isn't supported by your DAC, as described below.
The example below covers playing 88.2 kHz audio tracks if using the optical output of a pre-2010 Mac or Mac Pro, but also applies to audio tracks with other or higher sample rates (that is, when the DAC or playback chain doesn't support the native sample rate of the audio track).
Upsample: Activate the Upsample button to play 88.2 kHz upsampled to 96 kHz.
The Built-In Output must initially be configured in Audio Setup for a "target" rate of 96 kHz - the target sample rate pop-up menu (see attached image) should be set to 96 kHz (don't touch any of the other sample rate menus); then (important) click the Click to Apply Changes button.

Downsample: FLAC playback requires memory play, but downsampling is always done from disk. So, downsampled playback of FLAC files cannot be accomplished at playback time. The file format must be converted, or the file resampled. In order of preference (best sound quality first):
1. Use the File Sample Rate Converter (SRC) feature of Pure Music to create 44.1 kHz (for the optical output; or else select your DAC's highest supported sample rate in the SRC) versions of the FLAC files, then drag them into iTunes. Or,
2. Use the Apple Lossless Converter feature of Pure Music to create Apple Lossless versions of the FLAC files, then drag them into iTunes. They will be downsampled during playback.
Note: if concerned about using Apple Lossless, keep in mind that the compression algorithms used for FLAC and Apple Lossless are essentially identical.
|
Miscellaneous Tips
|
|
The iTunes shared library feature uses a closed architecture, making it impossible for Pure Music to locate the actual music files so they can be loaded and played using Pure Music's audio engine (the reason for using Pure Music). Pure Music has to be able to find the files to play them (as might be expected). :)
If you wish to use tracks from a shared library, the volume containing the music must be mounted (or "mapped" as called in Windows) locally, and the tracks / folders continaing music added to your iTunes library (drag them to your iTunes Music library in the iTunes application window).
IMPORTANT: Before dragging the tracks, in the Preferences in iTunes, be sure to uncheck the "Copy files to iTunes media folder..." preference to prevent iTunes from physically copying the tracks to your media folder. We also advise unchecking the Keep iTunes Media Folder Organized option.
Mounting the volume is done by using the Finder Go menu (Connect To Server...), by using afp (or smb if the files are hosted on a Windows-based computer or NAS).
IMPORTANT: For Pure Music plus iTunes to locate and play the music tracks, any volumes and hard drives storing music must have unique names. For example, it is OK to have two volumes, one named Music1 and Music2, but not OK to have two volumes with the same name, such as two volumes both named Music.

1. First, the remote computer must be running using an administrator level account, to be able to access all of the volumes from the other computer, and File Sharing must be enabled on both computers (System Preferences -> Sharing control panel). See image above.
2. To mount the remote volume:
- Type the IP address of the remote computer, for example, afp://192.168.0.3 or smb://192.168.0.3 in the Connect to Server window. The address, such as 192.168.0.xx, will depend on your setup, and will be listed in the Network pane of Apple’s System Preferences application on the computer connected to or containing the music storage device.
- Alternatively, click the Browse button. Click on the remote computer in the left of the resulting window (under SHARED), then double click on the volume containing the music to mount it locally after the remote connection is made.
To show the remote volume icon on the Desktop, set the Finder's "General" Preferences to show connected servers.
To automatically mount the remote volume every time the computer is started, select the Accounts control panel in the System Preferences. In the Login Items tab, click the + button, then navigate to the mounted volume, select it, and click Add. Note: do NOT check the check box in the Hide column of the Login Items; this will Hide the mounted item (not what you want to do).
|
|
|
Note: when the Preallocate feature of Pure Music 1.74 or later is used, the Memory Play adjustment dial is hidden, because Pure Music automatically makes the optimum memory play settings for you. Preallocate also significantly improves the efficiency of memory usage while reducing the CPU footprint and minimizing memory fetches.
You can expect a delay of up to several seconds as a track is loaded into memory. If the tracks are being accessed via an Ethernet connection of 100 BT or slower (such as wireless) and a gapless album is being loaded, this may take as long as a few minutes, and is simply a function of the network bandwidth. Compare this to the amount of time it takes to copy the same amount of tracks or files from the server to the local volume. The solution is the same as configuring your computer for faster network performance: use a wired 1000 BT / Gigabit Ethernet connection (and verify that it is operating at 1000baseT speeds in Apple’s Network System Preferences panel; click Advanced, then Ethernet), or else store your music on a hard drive (not the System drive) that’s connected directly to the computer via FireWire, USB2, ATA or SATA. Using the Hybrid Memory Play mode (with sufficient recommended RAM available) can help reduce the delay if playing gapless tracks.
The MEMORY PLAY dial adjusts the amount of available memory you want to dedicate to Memory Play, from 10 to 100 percent. The memory used for Memory Play is allocated dynamically from the available pool of never-used (green) and paged out memory (blue). These are the same default colors used in Apple’s Activity Monitor application, if the latter is set to display the memory usage “pie chart.”
To optimize the performance of the virtual memory system, the best maximum dial setting is at or less than the initial maximum of the “green” memory zone, unless your system disk is a solid state drive. With a solid state drive, the performance penalty resulting from memory paging (more likely with memory in the “blue” zone) is negligible.
The memory play dial setting is based on the fraction of available RAM, instead of a fixed value, to allow the virtual memory system to do its job, while avoiding generating excessive page faults (a bad thing for audio or any realtime task). If other applications are launched after launching Pure Music, the amount of available RAM will be reduced. Therefore, the amount of memory represented by a given dial setting will change dynamically. The maximum amount of RAM will be available immediately after a computer restart.
It’s normal for the relative proportion of “green” and “blue” memory to dynamically change. This is a sign of memory being used at least once (such as Pure Music using it for audio). This will be more evident on computers with less than 4 GB installed RAM. All allocated memory is freed when new tracks are loaded. This can be verified by toggling the MEMORY PLAY button, causing the current track to be reloaded. The amount of free memory will agree with the original value within plus or minus several tens of MB (it’s sometimes more or less, because of the way the virtual memory system works and interacts with other processes running on the computer). Apple’s Activity Monitor application also can be used to monitor RAM usage.
The performance tradeoff in the setting determines how long of a maximum pause you're willing to tolerate during loading music into RAM. If a large track (or group of gapless tracks) is encountered, and you don't mind waiting the extra time for loading, then just set it to maximum. A low setting will not load large tracks above the size threshold into memory, and such tracks will play directly from disk.
From an email to users with questions about the operation of Memory Play: Once memory has been used / touched or paged out it becomes part of the "inactive" pool (a term used by Apple; also see the System Memory tab in the Activity Monitor application for another illustration). This is expected behavior.
However, while the nomenclature of Virtual Memory may at first seem confusing or contradictory, ALL "green" and "blue" memory is still technically "free" and available for use.
The memory setting dial immediately after launching Pure Music should be used as a guide. On a machine with limited physical RAM, it's likely that *all* memory will eventually end up in the "inactive" pool, after using applications like Pure Music that make large memory allocations. Again, that is just a matter of Apple's terminology. This memory is still technically "free" and will be used by Pure Music when needed.
If Pure Music were not releasing memory, it would remain in what's called the Active pool. This can be monitored in the System Memory tab of Apple's Activity Monitor application. The "Real Mem" column in the Activity Monitor window provides additional information, showing the memory used by Pure Music, and this can be used to confirm that memory is properly allocated and released as needed, when new tracks are played. The amount of memory in use will be proportional to the size of the currently playing track (or all the tracks loaded in a group of gapless tracks), and will change dynamically.
Hybrid Memory Play Mode causes the pause at track load time to be independent of the memory play setting, so high settings can be used without long pauses. With gapless tracks, an overlay will be applied to the iTunes application window, to indicate the progress of the track loading operation.
|
|
|
Hog mode works with any audio device / DAC.
If Hog mode apparently is disabled for your DAC, this is because your DAC is assigned as the preferred system sound output device in Audio MIDI Setup (AMS).
Turning off Strict Device Validation in Pure Music's Audio Setup window and clicking Click to Apply Changes, Hog mode will be selectable without changing the AMS setting.
Turning off Strict Device Validation essentially makes Pure Music behave like various other player applications regarding Hog mode. However, Strict Device Validation provides a precautionary "safety belt" that (we believe) is unwisely omitted by the other players. This also is designed to alert you that using Hog mode in a casual way may lead to unexpected system behavior.
Here is what it says in the Pure Music (1.81) User's Guide regarding Hog mode:
- - -
ENABLE EXCLUSIVE ACCESS ("HOG" MODE)
This option reserves the audio device for Pure Music's exclusive use while Pure Music is running.
IMPORTANT: As a precaution, Hog Mode cannot be used for the audio device designated as the preferred device in Apple's Audio MIDI Setup application (AMS). The audio device assigned for Output in AMS should be set to a different device than the one used by Pure Music, to allow iTunes (or other applications) full-time access to an audio output device, if needed. (Just selecting the device in AMS isn't enough; the pop-up "gear" menu must be used to assign the small output "loudspeaker" icon to the device. See instructions under Streamthrough for an example of this using the Channel D PAD.)
If using the Built-In audio with a toslink cable, install the Channel D Streamthrough Audio Driver (see below) and select it in AMS as a default device. Alternatively, purchase an inexpensive pair of "USB Computer Speakers" and select them in AMS to use for playing system sounds.
Disabling Strict Device Validation in Pure Music will bypass this requirement, but doing so is at your own risk, as it may cause unexpected behavior in iTunes or Pure Music, or other issues.
- - -
(Note: if another player application is running with the device in Hog mode, Hog mode will be disabled in Pure Music. Only one software application at a time can be using a given device / DAC in Hog mode.)
|
|
|
1. Use the Hide Music Server Controls (Music Server menu, command - H) command in Pure Music to hide the user interface. Optionally, Pure Music may then be hidden next (Pure Music menu: Hide Pure Music; but you must hide the music server controls first).
2. Collapse the iTunes window (green button). Optionally, also Hide itunes.
|
|
|
If your DAC supports a 16 bit playback stream (take a look the Format shown in Apple's Audio MIDI Setup (AMS) application), set it to the highest bit depth available, using AMS. This setting only needs to be made once. (Most currently manufactured DACs only support a single bit depth stream format, such as 24 bit, and cannot be changed.)
It is unnecessary to set the bit depth to match each media format, as long as the DAC bit depth setting is equal to or greater than that of the media being played.
For example, setting a DAC to 24 bit will give identical results to setting it to 16 bit for 44.1 kHz 16 bit (CD quality) audio. This is an advantage of the way audio is designed on the Mac platform: audio is sent as 32 bit floating point streams (this is not indicated in AMS, this happens "behind the scenes"). A 16 bit stream sent to a DAC will be exactly the same whether the stream format selected in AMS for the DAC is 16 bit or 24 bit.
There is an exception to the above: if the volume control (or audio plug-ins, or the crossover feature) is used in Pure Music, such a stream will contain intermediate sample values that require a 24 bit stream setting for the audio quality to be preserved. Here, setting the stream format to 16 bit in AMS would actually degrade the audio quality, because of truncating the intermediate sample values. So, to eliminate this possibility, simply set the stream format to the highest available setting (24 or 32 bit; a few DACs will only support a 16 bit format).
|
|
|
The library scan within Logitech Media Server (LMS) scans through the .pmbmf Bookmark files, resulting in duplicate entries for each album within LMS, which can be a nuisance.
The solution is to make use of an undocumented feature in LMS to tell it to ignore certain folders during its scan.
The following line needs to be set within the server.prefs file within LMS:
ignoreDirRE: '\.pmbmf'
(it defaults to '')
Finding the server.prefs file can be a little tricky. On a Mac this would be found in ~/Library/Application Support/Squeezebox/.
After making the change, a clear and rescan gets rid of the duplicates and keeps both the iTunes/PureMusic and LMS libraries working happily together.
(Thanks to Pure Music user John Clark for the tip.)
|
|
|
- Pure Music Less is More Mode; or:
- Animate button off
- Song Info button off
- Upsampling off
- AudioUnit Plug-ins bypassed (if any are enabled, and depending on plug-in)
- Option to update play position in Remote disabled
- Metering button off
- Option to control track play position in iTunes disabled
- Option to update the track play position in iTunes disabled
- Memory Play button on
- Monitor volume Dithering off (or set to Uniform dither if on)
- Pure Music application (control strip / meter bar) in background
- Monitor volume set to 0 dB (audio pass-through without alteration)
Signal paths in Pure Music are special-cased to use the most high-efficiency routines available, depending on the options selected. For example, with the settings above, the audio from the music track(s) is transferred directly from the memory play buffer (RAM), using memory move instructions only. Gain adjustment and metering routines are completely bypassed.
|
|
|
Keyboard commands can be enabled or disabled using the check box in the Preferences window. These commands respond to direct key presses (command key not required) when Pure Music is the frontmost application:
- m = mute
- d = dim
- i = invert absolute polarity
- up arrow = increase volume
- down arrow = decrease volume
- right arrow = next track (same as in iTunes)
- left arrow = back track (same as in iTunes)
- space bar = toggle play / pause (same as in iTunes)
|
|
|
When using Pure Music, keep in mind that the user interfaces of two applications (both Pure Music and iTunes) are being controlled at once; not just one. iTunes is used to select the music, and Pure Music plays it. Consequently, there is (as expected) a small but sometimes noticeable lag between control inputs, such as initiating play, fast forward, skip back, etc. in iTunes, and when Pure Music responds to the commands. Think of waiting a heartbeat or so.
Besides the above, Memory Play mode (a feature not available in iTunes) imposes a delay of several seconds (depending on the number of tracks and the speed of the data connection, if located on a network drive) after pressing Play, while music track(s) are being loaded. If the media is located on a network volume, a slow network will increase the time needed to load track(s). The interface will be unresponsive during this track loading process.
When using the Server feature, envision how you would use a standalone, hardware based CD player (especially one having a memory play feature, which has the same side effect of delaying playback while the CD is loaded into memory). Press Play, relax, and experience the superb, crystalline, highest possible quality playback available for your music...
Enjoy!
|
|
|